Hello, my crafty friends. Welcome to the June Paper Crafting Blog Hop! I am participating in this blog hop with fellow Stampin' Up! demonstrators from across the globe! You might be starting the blog hop right now, or you may be coming from Joy Nelson's blog. Great project, Joy. Welcome one and all.
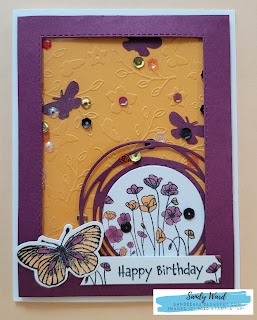
The theme for this month's blog hop is birthdays and today's card was inspired by my sister's recent shaker card for my niece's birthday. For her card she used the Hey Birthday Chick Stamp Set, but I wanted to use some of the butterflies from Butterfly Brilliance Stamp Set to accent the row of poppies image from the Painted Poppies Stamp Set.
The card base is a side fold, portrait A2 (8 1/2" x 11" sheet, cut in half at 5 1/2", scored at 4 1/4") in Basic White cardstock. To create the shaker piece, first stamp the poppies image on a scrap of Basic White and die cut it with the #5 circle die. It is layered on this wild circle die cut from Painted Labels dies in Rich Razzleberry. This 2" circle fits perfectly! The background is Mango Melody cs, cut 3 1/4 " by 5", and embossed using the Meadow Moments Embossing Folder.
My shaker bits collection: 1) several of the Artistry Blooms Sequins in Rich Razzleberry (oops, one is really high and hidden by the frame!) and adhered in the centers of the embossed flower images, 2) I glued down a couple of solid Rich Razzleberry butterfly die cuts, and 3) a couple of pinches of the Painted Poppies Sequins. These are retired now, but I still had some in my stash -- the colors match perfectly!!
To create the shaker: I adhered the Mango Melody cs to a bit wider Basic White piece, cut 3 3/4" x 5", and the whole thing goes into a CLEAR envelope! Add the couple pinches of sequins and carefully turn it over to seal the envelope. The envelope is larger than the cardstock so fold up two of the sides and tape them down. Because the shaker "packet" will be smaller than the Stitched Rectangle frame (the #6 from center die fits perfect), you can just adhere the packet straight to the card base and then adhere the Rich Razzleberry frame. Voilà!!
How about the CLEAR envelope for a shaker hack! Let me know if this is the first you have heard of this.
So, now it is time to check out the great project by our next blog hopper, Julia Mazur.
This is a full list of our bloggers this month and their links in case you find yourself off track:
Thank you for stopping by my blog today! I hope my project has inspired your creativity. Feel free to leave a positive comment below with a trail to find you so I can find your creations out on the "www" - I look forward to it.
Also, be sure to check out the Business News section below - there is lots of information and updates to share.
Stamp On!!
Sandy
✂️✂️✂️ #ilovepapercrafts ✂️✂️✂️
sandee904@yahoo.com
sandee904.stampinup.net | sandee904.blogspot.com
Facebook: stampinwithsandee | Instagram/Pinterest: sandee904
SUPPLIES/CARD DETAILS
All the supplies used to create this card can be ordered through my online store.
Stamps:
Painted Poppies Stamp Set • Item# 151599
Butterfly Brilliance Stamp Set • Item# 155092 / Bundle 155821
Hey Birthday Chick Stamp Set • Item# 154464 (Sentiment)
Ink:
Regals Collection Classic Stampin' Pad Rich Razzleberry • Item# 147091
Regals Collection Stampin' Blends Combo Pack Blackberry Bliss • Item# 154877
Regals Collection Stampin' Blends Combo Pack Pumpkin Pie • Item# 154897
Memento Tuxedo Black Ink Pad • Item# 132708
Paper:
Regals Collection Rich Razzleberry Cardstock • Item# 115316
Brights Collection Mango Melody Cardstock • Item# 146989
Basic White Cardstock • Item# 159276
Accessories/Tools:
Clear Medium Envelopes • Item# 102619
Painted Labels Dies • Item# 151605
Brilliant Wings Dies • Item# 155523 / Bundle 155821
Layering Circles Dies • Item# 151770
Stitched Rectangles Dies • Item# 151820
Don't forget your favorite adhesive. I recommend the new Stampin' Seal • Item# 152813 and Multipurpose Liquid Glue • Item# 110755 for this project. I did not use Stampin' Dimensionals on this project, but maybe I should have lifted the embellishment build • Item104430.
I would appreciate it if you use the host code found on the sidebar of my blog when ordering through my online store, however, do NOT use this Host Code if your order already qualifies for Stampin' Rewards ($150 USD). If your order is $25 or more, and you would like to receive an instruction sheet with dimensions and detailed directions, please send me an email with a request for the "Painted Poppies n Butterflies Card 0621" Instruction Sheet.
BUSINESS NEWS
MONTHLY WORKSHOP REMINDER
(June 19, 2021 @ 11 AM)
Plans for the workshop this month are not finalized yet, but I am leaning toward the new butterfly stamp set - Butterfly Brilliance. Keep motivated and crafting this month - I am so looking forward to seeing your creations. Take a picture of the cards you make and share with us all in the comments during my Facebook Live. For everyone that places an order of $25 or more using the monthly host code (see the sidebar), I will send you the next month's (July's) workshop card kits in advance of the workshop.
PAPER PUMPKIN
Hope you were able to subscribe in time for the June Paper Pumpkin kit. Be sure to Like and Follow my Facebook page for discussions with other Paper Pumpkin subscribers. Not a subscriber already? No problem. Contact me and let's get you signed up by July 10 in time for the next kit so that you do not miss out any more!
2021 MINI CATALOG
(January 4, 2021 - June 30, 2021)
The LAST CHANCE sale has already begun. The Mini Catalog is set to retire on June 30. It’s always bittersweet to see a classic Stampin’ Up! catalog take a trip to retirement. But, we’re looking forward to all the new products on their way—and we hope you are, too! Stock up on your favorites before they are gone for good! Save up to 50% on essential craft supplies while supplies last. If you need a list of the retiring product, just let me know.
2021-22 ANNUAL CATALOG
(May 4, 2021 - May 2, 2022)
If you do not already have a copy of the 2021-22 Annual Catalog, and do not already have a demonstrator, it would be my pleasure to be your enabler (er, I mean demonstrator) and send you a copy of your very own! (Click the link on the sidebar for a virtual copy.)
As always, if you have any questions, or need any assistance, contact me in your favorite method of communication. :)


What a fun shaker card!
ReplyDeleteOh my - this was such a fun card to make! I hope everyone gives it a try.
DeleteSandy, I love your color choices for this cute shaker card!
ReplyDeleteI really love secondary colors together!
DeleteLove a good shaker card! ANd this one is super fun and gorgeous. THe circle detail at the bottom right looks so effective!!
ReplyDeleteThank you, Julia. The wild circle does "jazz" the card up a bit!
DeleteSuch an easy way to create a shaker card. Great colours, happy and bright.
ReplyDeleteYes. This will definitely increase the number of shaker cards I make.
DeleteGreat composition for your faker shaker!
ReplyDeleteThank you, Shirley. I like that, "faker shaker."
DeleteLove your shaker card! This is the first time I've seen an envelope shaker card created like this. Thanks for sharing!
ReplyDeleteThanks, Terri. It is really easy. Give it a try!
DeleteSuper easy way to make a shaker card. TFS
ReplyDeleteHi, Tracy. Yes - super easy!
DeleteGreat shaker card! I love the embossed piece as the inside background!
ReplyDeleteThanks, Julia. The embossing folder with the little butterflies (1 of 2, Meadow Moments) is super cute.
DeleteBeautiful card and I love a shaker card.
ReplyDelete