Showing posts with label Photopolymer. Show all posts

Sunday, April 19, 2015

Sheltering Tree Stamp Set for FMS182

In my last post, I mentioned that we would be using the Sheltering Tree Stamp Set from the Stampin’ Up! 2015 Occasions Catalog and the Scallop Tag Topper Punch for this month’s club card. Well, it has been a busy month for me and by Friday night I still hadn’t gotten my act together for club on Saturday. I needed some inspiration! Once I saw the sketch challenge from Freshly Made Sketches – “EUREKA!” I knew that was it. Try as I might, I was unable to incorporate the Scallop Tag Topper Punch into the sketch. (Never fear, it will return because you know I love cards with tags!!) Now, back to business.

Rita, a member of the design team at Freshly Made Sketches, has come up with a beautiful “clean-lined” design. Here it is…


Now here’s my card...
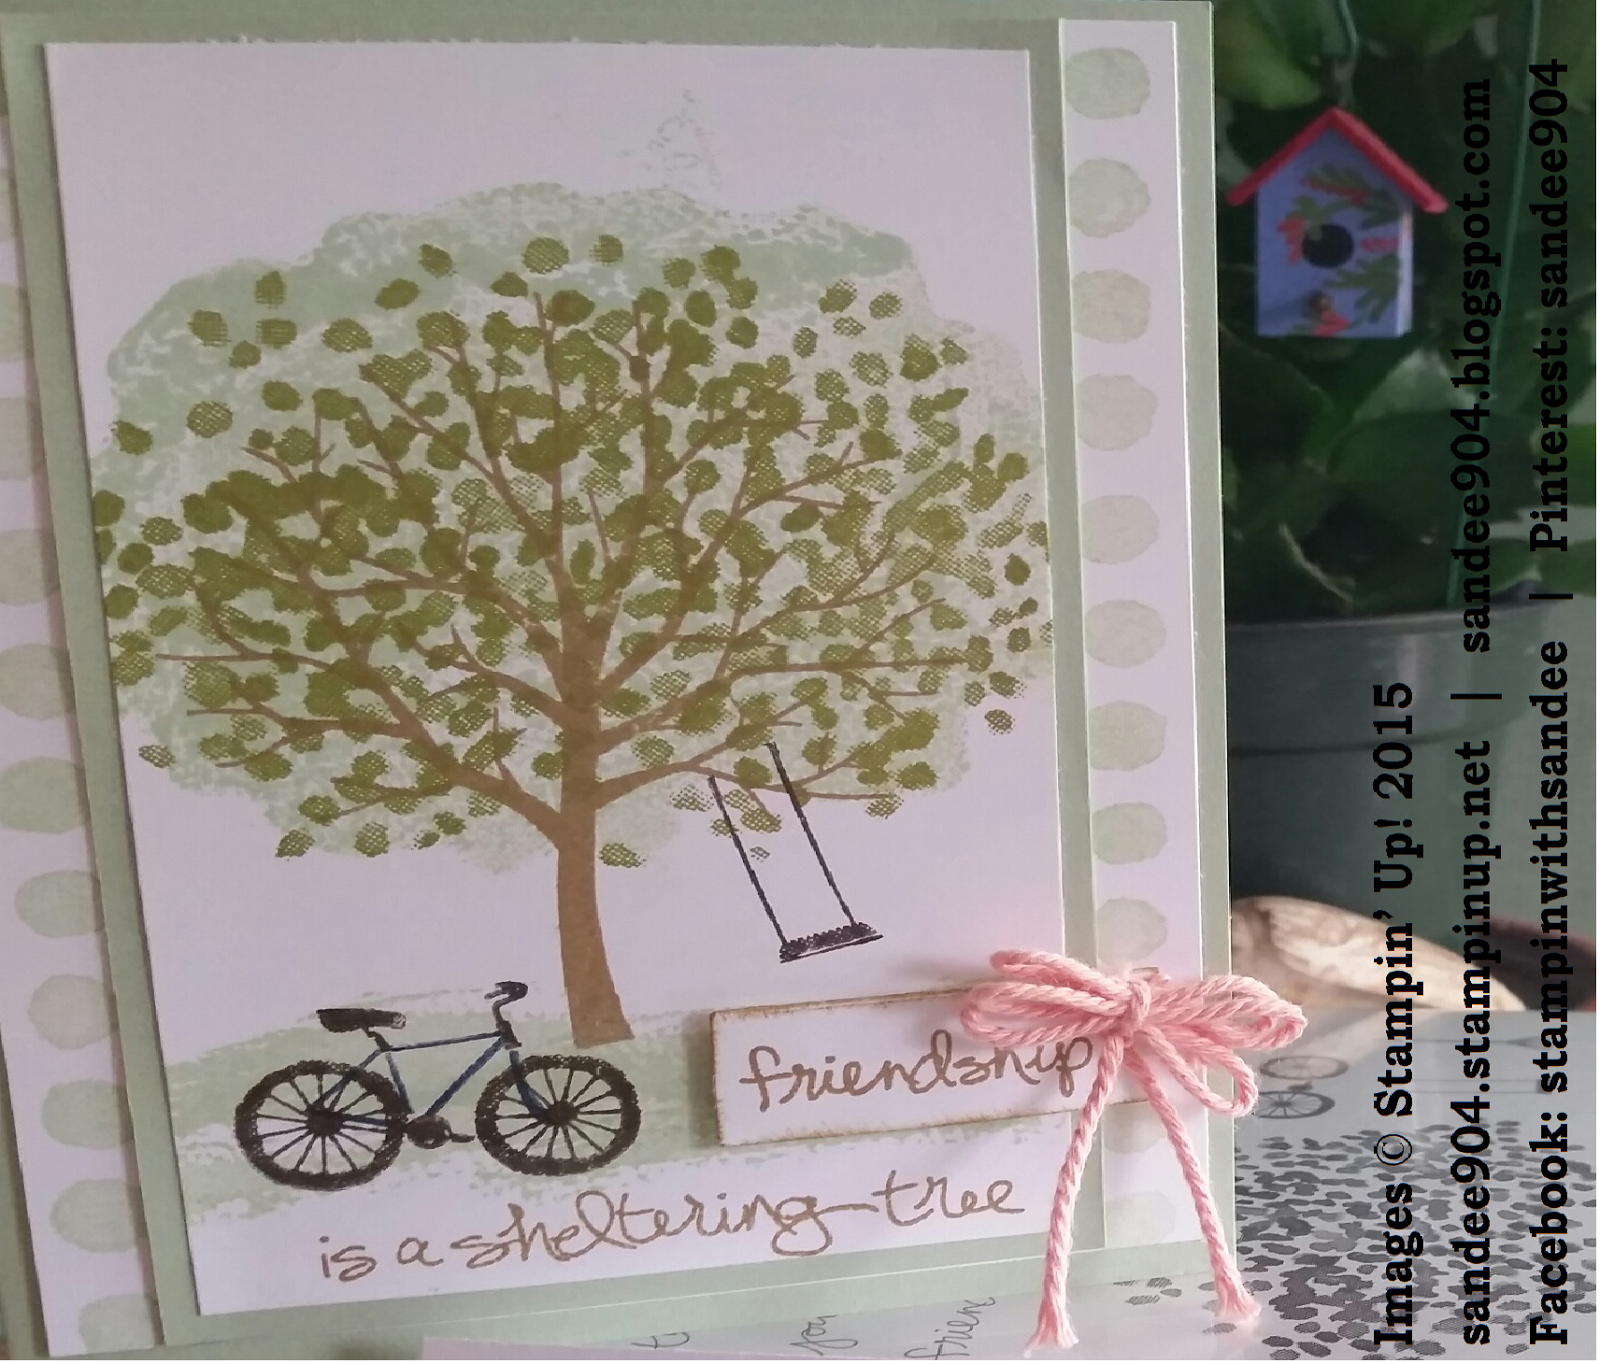


The Sheltered Tree stamp set I am using is a photopolymer set which allowed for some “reverse image” stamping. What is “reverse image” stamping you say? Well, just that – reverse the image! Adhere the detailed image side of the stamp to the clear block and ink the flat side, or the reverse side of the stamp, which created this wonderfully full-blooming tree effect (affectionately nicknamed the blob effect at club). I used 2013-15 In Color Pistachio Pudding (really going to hate to see this color retire in June!) for the full bloom effect. Clean the stamp and adhere the flat side of the image to a clear block and ink the intended leaf image in Old Olive. Line it up with the “blob” and stamp. Turned out nicely. The color for the tree trunk is 2013-15 In Color Baked Brown Sugar (pause for sadness to fade again). The tree swing and bicycle is stamped in Early Espresso. The bicycle frame is stamped in Night of Navy.

I decided to use the stamp set’s signature sentiment, “Friendship is a sheltering tree.” I love the sentiment, and really love the font! To keep to the design of the sketch challenge, I masked the sentiment and inked in Baked Brown Sugar the word “friendship.” Although it is hard to see, the word is cut out using the smallest banner die cut, some quick sponging of Baked Brown Sugar around the edges, and affixed to the right side of the card just below the swing. The bow is created with 3 loops using the Crisp Cantaloupe Thick Baker’s Twine. In this picture it hides the “flag” portion of the banner. Reversing the banner so that the flag pointed left instead of right would be a better choice.

To finish the card, I layered on slightly larger Pistachio Pudding card stock, layered again on Whisper White card stock (trimmed with a row of circles from the Painted Petals stamp set — my favorite Stampin’ Up! stamp set), and adhered to a Pistachio Pudding card stock base of 51/2 x 4 1/4.

If you would like specific dimensions and instructions to create your own card, please e-mail me and I will be happy to share them with you. And if you don’t already have a Stampin’ Up! demonstrator, it would be my honor if you selected me to help you in your future creations!

Stamp on!


Sandy
sandee904@yahoo.com

sandee904.stampinup.net  |  sandee904.blogspot.com
Facebook: stampinwithsandee | Pinterest: sandee904

Tuesday, December 30, 2014

Festival of Trees and Endless Wishes Stamp Sets Make this Festive Holiday Card

I hope your holiday has been great so far. The new year is just another day away. Better brush up on your new year’s resolutions!

My new year’s resolution this year is to be more active in blogging about my love for stamping. I am starting today! As you know, I am a Stampin’ Up! demonstrator. I have grown my base group of fellow stampers from one monthly workshop to a second group that meets every other month. They are a great group of people and have a special place in my heart.

Today, I want to share with my virtual followers the holiday card I created this year using Stampin’ Up! Festival of Trees Stamp Set from the Holiday Catalog (HC p. 24; note the bundle includes the Tree Punch). I decided to use a non-traditional green for the holiday trees on my card. The design needed to be simple in order to make multiple cards and, although it was fairly simple to put together, they turned out beautiful.

The color scheme is Pear Pizzazz from the Subtles Collection and Lost Lagoon from the 2014-16 In Color Collection. Feel free to save this color scheme for future inspiration.


These colors coordinate perfectly with the All is Calm Specialty Designer Series Paper from the 2014 Holiday Catalog (HC p. 22).


Stampin’ Up! identifies the colors that coordinate with the DSP in both the catalog and on the packaging. This is a great idea for planning purposes – and for your future projects – taking the guesswork out of color coordination. 

I prefer to use Whisper White for the base of my cards when I have a “heavy” card front so that I don’t have to add another layer to the inside of the card for the sentiment. Another layer might have tipped the scale on the postage meter which is not a good thing when the mailing list is long.

If you are not able to tell from the photo, the center tree is stamped and snipped separately from the others. I used the Tree Punch from the Holiday Catalog (HC p. 24) to speed up the process due to the number of cards I was making, but you can stamp and snip one just as well. The individual tree is lifted up from the card with Stampin’ Dimensionals. No punch necessary for the tree stand - a couple of straight snips will do if the images are stamped side by side alternating right-side up and right-side down on a 1/2” strip of Whisper White card stock. The photopolymer stamps make lining images up so easy.

Front of Card Sentiment:  I tried to change up the sentiments for variety. Sometimes I stamped the sentiment directly on the main image (see the square “very merry” card), or sometimes I stamped on the strip of DSP (see the circle “celebrate the season” card). Small changes that personalized each card! So simple.

Finishing touches:  I alternated between a Lost Lagoon 3/8” Silky Taffeta Ribbon (HC p. 22) bow or the Frosted Sequins (HC p. 22) with a 4 mm rhinestone from the Rhinestone Basic Jewels (AC p. 209) adhered to the 1/2" strip of Lost Lagoon behind the main image. The star that tops the lead tree is punched from Silver Glimmer Paper (AC p. 193) using the Star Punch from the Itty Bitty Accents Punch Pack (AC p. 222).

If you need the dimensions for the cuts, I would be happy to furnish detailed instructions. Just send me your request via email.

Please remember that there is only a short time left for ordering from the Holiday Catalog, or the Clearance Rack with up to 80% discounts on retired or about to retire product – January 5 is the last day! I noticed this morning that there are only a couple of items on the backorder report so put your order in today. Do not delay another minute. As always, I would be honored if you selected me as your demonstrator on your online order. You can find the online store through my Stampin’ Up! website (URL below).

Happy Holidays!  And see you next year.

Stamp on!  Sandy

PS: Check back on January 6th for news and updates regarding Sale-A-Bration and the release of the Occasions Catalog (formerly known as the Spring Catalog).

Email me at:
sandee904@yahoo.com

Find me at:
Stampin' Up! Web Page:  sandee904.stampinup.net  

Follow me at:
Facebook: stampinwithsandee  
Pinterest:  sandee904

Tuesday, August 27, 2013

Kind & Cozy Stamp Set

From my Stampin' Up! blog...

This month’s Friends n Neighbors Stamp Club was a swell chance to get together with everyone before school started up again to make some cards. In addition to the Chalk Talk card (using the Chalk Talk Stamp Set, coordinating Chalk Talk Framelit Die, see my last blog), we also had time to make cards with the new Kind & Cozy Stamp Set. The tiny tea cup is just perfect! This set incorporates the gingham pattern so great to again be able to use the Gingham Stampin’ Around Wheel. I love it when everything coordinates!

This stamp set has everything to make a simple card and (with a little butterfly punched out of gingham “wheeled” paper, candy dots or ribbon) easy to bling. You might consider adding the Kind & Cozy Stamp Set and Gingham Stampin’ Around Wheel to your collection!

Check back soon for an update on September’s cards where we will focus on our Halloween cards and treats!


Stamp on!!

Sandy

Click on the link to go to my Stampin' Up! online store or visit me at:

Stampin' Up!:  http://sandee904.stampinup.net  
Facebook:  https://www.facebook.com/stampinwithsandee
Pinterest:  http://pinterest.com/sandee904


Stampin' Up! Promotions August Update

Quickly coming to an end – The Paper Pumpkin promotion ends on August 31. Now don’t get upset, you can still join Paper Pumpkin after August 31, it is just the discount that will end. Please contact me for more information!

Pick a Kit Recruiting Offer ends on August 31 – New recruits get to pick one of four project kits for free in addition to their starter kit when they join Stampin' Up! Please contact me for more information! I would LUV for you to join my team.

Don’t forget that if you can update your Stampin' Write Markers collection with any individual colors you are missing or ALL of the new colors for a limited time. (Contact me for the item numbers) This offer ends October 31, 2013. The entire markers kit can be found on page 163 of the Annual Catalog (item 130034).

Released August 15 – A brand-new photopolymer stamp set is now available. Another Thank You (item 133454) is an exclusive, versatile set for any occasion that calls for a thank you.


Updated August 14 – A new, holiday-themed collection of single stamps is now available! The holidays will be here before you know it, and these holiday-themed single stamps may be just what the budget-conscious stamper needs. There are eight different stamps to choose from, six of which coordinate with Framelits dies or punches.


Released August 1 – The Holiday catalog is here!! If you placed an order from me in the last 6 months, your copy is on its way. (Please let me know if you haven’t received it yet!) And, if you would like a catalog, I will send you one without charge if you purchase $25 or more any time before the catalog's expiration (or before they are no longer available for purchase).

Released August 1 – Best of 25 Years Stamp Set - Best of Halloween. Super spooky, right.  (Item #134381 clear mount $14.95).


Released August 1 – Thinlits Card Dies are now available to order. You can make flip cards in a snap with these new dies. These new card dies come with extra die pieces that have versatile designs, so you can use them on other projects, not just flip cards. (The Circle Card Thinlits Die comes with 10 total pieces; the Label Card Thinlits Die comes with nine total pieces.)


Thursday, August 8, 2013

Chalk Talk Stamp Set and Framelit Die Bundle

It is just impossible to pick one stamp set out of the 2013-14 IBC as a favorite stamp set, but I mean it when I say this is my favorite stamp set!  Maybe it is because of the 15% discount when you buy as a Stampin' Up! bundle.  The coordinating Framelit dies are amazing and they really make a project POP!


Our next project will be using the new Kind & Cozy stamp set, the new Gingham Stampin' Around Wheel and the coordinating Gingham Garden DSP (of course).  No sneak peak yet.  Come back later.

PROMOTIONAL ITEMS

Released August 1 -- The Holiday catalog is here!! If you placed an order from me in the last 6 months, your copy is on its way.  And, if you would like a catalog, I will send you one without charge if you purchase $25 or more anytime before the catalog's expiration (or before they are no longer available for purchase).

Released August 1 -- Best of 25 Years Stamp Set - Best of Halloween. Contact me via email or go to my online store at sandee904.stampinup.net (Item #134381 clear mount $14.95).


Available for purchase beginning August 9 – Stampin' Trimmer Rotary Addition and decorative cutting blades (see pp. 176 and 177 of the 2013-2014 annual catalog). 

I hope this motivates you to take a few minutes today to stamp!  Feel free to contact me if you need anything.

Stamp on!

Sandy


Monday, June 3, 2013

Wanderlust Photopolymer Stamp Set

On June 1, Stampin' Up! released a new photopolymer stamp set...Wanderlust.


What makes photopolymer stamps so great?
  • They're entirely transparent for perfect placement every time! 
  • They are durable. The photopolymer material is designed to last. 
  • Can you say sticky? (Don't worry; in a good way.) These stamps stick amazingly well to our clear blocks.
  • They're age tested. They won't yellow or cloud up over time.
They are clearly a great choice.  Click "Shop Now" on this page to place your order today.

Stamp on!

Sandy