Showing posts with label Stampin' Up. Show all posts

Wednesday, October 23, 2019

October Simple Stamping Challenge Using Country Home Stamp Set

Hello, my crafty friends. Last week on my blog I featured a quick and easy handmade card using the Country Home Stamp Set (click HERE in case you missed it). It was my submission for the monthly Paper Crafting Blog Hop I participate in with several other Stampin' Up! demonstrators. It is a fun group of demonstrators from the US and other countries and we have a great time showing you (and each other) our ideas, tips and tricks.

Today I thought it might be fun to try a Simple Stamping Challenge by Stamping Up a/k/a #simplestamping. The October challenge is to create a card using stamps, ink, paper, and punches. The theme is "Thank You."
Challenge, Country Home, Punches, #simplestamping
My card features the beautiful floral arrangement on the "inside" of a Whisper White Note Card and I used the 2" circle punch on the front panel to create negative space, i.e. the peek-a-boo effect (hum, really hard to see in this photo though, my apologies). I finished the opening with a frame of Cherry Cobbler Cardstock double-punched with the 2-1/4" and 2" circle punches. Color is added to the floral arrangement with a Blender Pen and several ink pads (see the supplies list below). An alternative would have been to use the Stampin' Write Markers or the Stampin' Blends, however, I was unsure if Markers or Blends would be considered "ink" under the rules of the challenge.
Challenge, Country Home, Punches, #simplestamping
This photo is the original design. It is exactly the same as the card above except it eliminates the Cherry Cobbler Cardstock frame around the peek-a-boo effect and the edges are sponged with Cherry Cobbler Classic Ink.

Thank you for stopping by my blog today! I hope you have enjoyed my #simplestamping card featuring the Country Home Stamp Set. I know that I have enjoyed sharing it with you. 


Stamp On!!

Sandy

sandee904@yahoo.com
sandee904.stampinup.net | sandee904.blogspot.com
Facebook: stampinwithsandee
Instagram/Pinterest/Twitter: sandee904


SUPPLIES/CARD DETAILS

All the supplies used in this project can be ordered through my online store.

Stamps:
Country Home Stamp Set (AC p. 95, Item #147678)

Ink:
Regals Collection Classic Stampin' Pads (AC p. 163)
-Cherry Cobbler, Cajun Craze, Pumpkin Pie, Crushed Curry, Garden Green
Subtles Collection Classic Stampin' Pads (AC p. 163)
-Calypso Coral
Neutrals Collection Classic Stampin' Pads (AC p. 162)
-Crumb Cake
Tuxedo Black Memento Ink Pad (AC p. 180)

Paper:
Whisper White Note Cards & Envelopes (AC p. 168)
Regals Collection 8-1/2" x 11" Cardstock (AC p. 163)

Tools/Accessories:
Blender Pens (AC p. 180)
Stamping Sponges (AC p. 181)
2" (5.1 cm) Circle Punch (AC p. 187)
2-1/4" (5.7 cm) Circle Punch (AC p. 187) 


PAPER PUMPKIN

Hope you were able to subscribe in time for the October Paper Pumpkin kit. It is truly beautiful. Be sure to Like and Follow my Facebook page for discussions with other Paper Pumpkin subscribers. Not a subscriber already? No problem. Contact me and let's get you signed up by November 10 in time for the next kit so that you do not miss out any more! November's kit coordinates with the October kit, but October's kit is not a prerequisite for ordering the November Kit. These kits are going to help us create some fantastic holiday projects.


ADD THIS TO YOUR TUESDAY TO DO LIST  

#1 - Check for new products added to the Clearance Rack. You are not going to believe that The Everything Is Rosy Product Medley is still on the Clearance Rack, available for purchase at 15% off (while supplies last). If you need more information on Stampin' Up!'s product medley, message me for the flyer showing everything that is included. PLUS, those adorable True Gentlemen Buttons from the Spring catalog last year. I most sincerely, highly recommend that you do not delay in placing your order. 

HOLIDAY CATALOG
(Sept. 4, 2019 - January 2, 2020)

If you placed an order from me over the past year, you likely have already received a copy of the new 2019 Holiday Catalog in the mail. If you did not receive one, please contact me immediately and let's fix that. If you do not already have a demonstrator, it would be my pleasure to be your enabler (er, I mean demonstrator) and send to you a copy of your very own. Chock full of inspiration and ideas. Did you know that there are 25 products under $25 in this catalog? ...Stocking Stuffers at a price point that makes everyone happy! 

As always, if you have any questions, or need any assistance whatsoever, contact me in your favorite method of communication. :) 

Thursday, April 19, 2018

Coffee Break Designer Series Paper Follow Up

Just a quick follow up to my post on Wednesday. In yesterday's blog hop, I shared my Coffee Cafe' Card version 2.0 where I mixed up the Coffee Break Designer Series Paper (DSP) to make a new card out of leftover packets from a previous card. I hope you enjoyed the blog hop. What a fabulous group of demonstrators I have found that love to share everything Stampin' Up!

As promised, today I am sharing my template and instructions for cutting the DSP to make this card.


The Crumb Cake card stock base is a standard A2, 5-1/2” x 8-1/2” scored at 4 1/4" (envelope size - 4-3/8” x 5-3/4”). The next layer is Soft Sky card stock, 4" x 5 1/4". This will be the base for layering our cut pieces and the new background for our cute, cute coffee cup embellishment.

Instructions for cutting DSP:

The original size of the DSP from the previous pack was 3 7/8" x 5". The first step is to cut 1/8" off both the short and long sides (Cuts #1, #2 grayed out with a Tranquil Tide Stampin' Write Marker, of course!). The new measurement of the DSP is 3 3/4" x 4 7/8". (Pardon my rudimentary drawings, but cute balloons, right?)


Next cut a 1" strip from the long side (Cut #3). You can chose either long side. I picked the left side to take advantage of the numbers along the edge for this picture.  Place both pieces together and cut at 3" (Cut #4) so that there is the nice, big piece of your "favorite" side of the DSP for the bottom left of your card front.


That is really all there is to it. However, if you are starting from all scraps, the sizes are (top left, clockwise, from the photo of the card, not the template.):

1. 1" x1 7/8'
2. 2 5/8" x 1 7/8"
3. 1" x 3"
4. 2 5/8" x 3"

Shameless plugs:

Last Chance for Retiring Products:
Select products from the 2018 occasions catalog and 2017-2018 annual catalog are retiring—and this is your last chance to get them before they are gone. IMPORTANT NOTE: A lot of the bundle products will carry over to the new 2018-2019 annual catalog, however they will no longer have the bundle pricing (10% discount). You can find more details in my online store. Use the shop now button, and be sure to use the April Hostess Code NE24A473. Do not use the hostess code if your order will exceed $150 so you will earn the Stampin' Rewards!

Paper Pumpkin:
If you don't subscribe already, here's a great incentive. Special pricing for signing up for Paper Pumpkin between now and May 10. Creativity Starts with Paper Pumpkin -- get 50% off for two straight months.  You have to sign up by May 10. Use the code SAVEFIFTY0418 Let me know if you have any questions. 

Join My Stampin' Up! Team
I would love it if you would consider joining my team as a demonstrator for Stampin' Up! There are so many advantages, but the best is joining all of us in November for Stampin' Up! 30-year anniversary celebration in Orlando.  Message me for details.


Stamp On!!

Sandy
#StampinUp30

sandee904@yahoo.com
sandee904.stampinup.net | sandee904.blogspot.com
Facebook: stampinwithsandee | Pinterest: sandee904

Wednesday, January 3, 2018

New Year's Resolutions and Rose Wonder Change Up with Celebrate You Thinlits Dies


Happy New Year my crafting friends!! And with a new year there are new year's resolutions, right? What are your resolutions? Good luck to you. I have reflected on 2017 and come up with one resolution -- show appreciation for my friends!! Of course, I appreciate all of my friends, but let me show you how much I appreciate YOU. I was thinking that one way to show my appreciation would be to share crafting inspiration with you on various social media outlets - like my blog. Message to me: Stop avoiding the blog!!

So welcome to the Sale-A-Bration 2018 Blog Hop! To accomplish my resolution, I have joined a group of Stampin' Up! demonstrators that want to showcase the new, free products found in the Sale-A-Bration 2018 catalog beginning today, January 3. I am so honored to be a part of this group of fabulous crafters.

I earned the Celebrate You Thinlits Dies [Item no. 146840] and I have combined them here with the Rose Wonder Stamp Set [Item no. 140697] found in the Annual Catalog on page 162 and the Rose Garden Thinlits Dies [Item no. 140619] page 216.


My card on the right uses the new Stampin' Blends (Stampin' Up!'s alcohol markers that are available in the 2018 Occasions Catalog, pages 30-31) in two colors: Light Rich Razzleberry and Light Old Olive after stamping the rose outline in Memento Tuxedo Black ink. I die cut the word "YOU" in Rich Razzleberry Cardstock and die cut the word "amazing" three (3) times in Basic Black Cardstock and stacked them together for dimension. I struggled with the word "are," and settled on masking it from one of the sentiment elements in the Rose Wonder stamp set. Here's a close up picture...


My card on the left uses the inlaid technique. I stamped the rose outline in a stamped off Smoky Slate classic ink on Whisper White Cardstock and colored again using the new Stampin' Blends Light Rich Razzleberry and Light Old Olive markers. I carefully placed the die cut pieces in a Basic Black die cut. I am not going to lie, it did try my patience. The "amazing" die cut is also done with the inlaid technique. Be sure to keep track of all those pieces. I love the fonts for both die cut words. I changed up the word "are" with a build of shortened cuts of the Classic Label Punch. This is a close up of my second card...


I finished the inside of both cards with this sentiment from Just Add Text Stamp Set [Item no. 143934] found on page 167 of the Annual Catalog...


In case you are new to Stampin' Up!, Sale-A-Bration is held once a year from January through March 31. You earn exclusive free Stampin' Up! products with every qualifying purchase. You also earn rewards for hosting a workshop or becoming a Stampin' Up! demonstrator during Sale-A-Bration. If you do not already have a demonstrator, it would be my pleasure to help you place an order, show you how to earn the free products or join my team.

I am so happy that you stopped by my blog today! I hope you have enjoyed my cards and that you now know how much I appreciate YOU!!

Make sure you keep hopping along to see all the other Sale-A-Bration projects! Click on the "Next" button below to visit Nicole Wilson's blog.


Sandy Ward  (YOU ARE HERE)

[NOTE: if you are reading this on my demonstrator web page, sandee904.stampinup.net, this blog originally posted on January 3 to my blog, Sandee What!, so if the links do not work here, please visit my blog at sandee904.blogspot.com for the links.]

Stamp On!!


Sandy 
sandee904@yahoo.com

sandee904.stampinup.net | sandee904.blogspot.com
Facebook: stampinwithsandee | Pinterest: sandee904

Thursday, June 2, 2016

Introducing the New Stampin' Up! 2016-17 Annual Catalog and Hearth and Home Framelits Card

Before I share my comments on May's club card, I just wanted to take a moment to thank everyone for their support over the last year. It has been my pleasure to help you with your paper crafting and stamping projects. I am honored that you trust me. The new Stampin' Up! catalog release was yesterday (June 1) and I cannot wait to show everyone at our next workshop. It is full of great products and inspiration! To the right is a link to a pdf of the catalog for your quick reference throughout the next year. Happy stamping!

Now, this past month's club card featured the Happy Home stamp set from the 2016 Occasions catalog that retired Tuesday, May 31, but the alternate card used the stamp with the three small flowers and the coordinating Hearth and Home Framelits. Since the club card was a CASE of the card sample in the catalog, let's talk about the alternate card, and how to "fix" it with current catalog product.

Indoors: The flowers in the window are placed in the first vase from the Vivid Vases stamp (retired May 31 -- I recommend using the Flower Patch Stamp Set to replace the flowers and vase/use the small end of the large leaf/upside down). I colored the vase using the Daffodil Delight Stampin' Write marker and the stems are hand drawn with an Old Olive Stampin' Write marker. The lace curtains are Venetian Crochet Trim (retired May 31 -- I recommend Very Vanilla 1/2" Lace Trim/adorable!).

Outdoors: The window box is full of flowers created with the Petite Petals punch (Perfect Plum, Calypso Coral) and the centers of the flowers (Daffodil Delight) from the Itty Bitty Punch Pack (retired May 31 -- I recommend the small flower from the Blossom Bunch Punch). The flower centers are various Regals candy dots (retired May 31 -- I recommend the new Enamel Shapes). The leaves are the tops of the branch from the Bird Builder punch (retired May 31 -- I recommend the leaf from the Flower Fair Framelits).

House: The color choice for this traditional Florida beach house is Blushing Bride card stock run through the Big Shot with the Brick Wall TIEF and a window trim of Mint Macaron. (Tip: Be sure to cut out the "window" from the Blushing Bride layer first.)

Until I wrote out my blog I had not realized just how many retired product went into this card, but the recommended replacements will make this card a winner for sure. I would love to see pictures of cards you create from my example. Please share them with me on Facebook or Pinterest.

Just a little business yet. I wanted to tell you about the promotion during the month of June. For each workshop (or order) of $350 USD/$400 CAD or more in sales, the hostess will receive $35 USD/$40 CAD in Extra Stampin’ Rewards. This is an excellent opportunity to start adding to your collection from the new catalog. Remember, Stampin’ Rewards can also be used on Starter Kits, which are even better this month!


Stamp on!

Sandy

sandee904@yahoo.com
sandee904.stampinup.net  |  sandee904,blogspot.com
Facebook:  stampinwithsandee  |  Pinterest:  sandee904

Sunday, April 19, 2015

Sheltering Tree Stamp Set for FMS182

In my last post, I mentioned that we would be using the Sheltering Tree Stamp Set from the Stampin’ Up! 2015 Occasions Catalog and the Scallop Tag Topper Punch for this month’s club card. Well, it has been a busy month for me and by Friday night I still hadn’t gotten my act together for club on Saturday. I needed some inspiration! Once I saw the sketch challenge from Freshly Made Sketches – “EUREKA!” I knew that was it. Try as I might, I was unable to incorporate the Scallop Tag Topper Punch into the sketch. (Never fear, it will return because you know I love cards with tags!!) Now, back to business.

Rita, a member of the design team at Freshly Made Sketches, has come up with a beautiful “clean-lined” design. Here it is…


Now here’s my card...


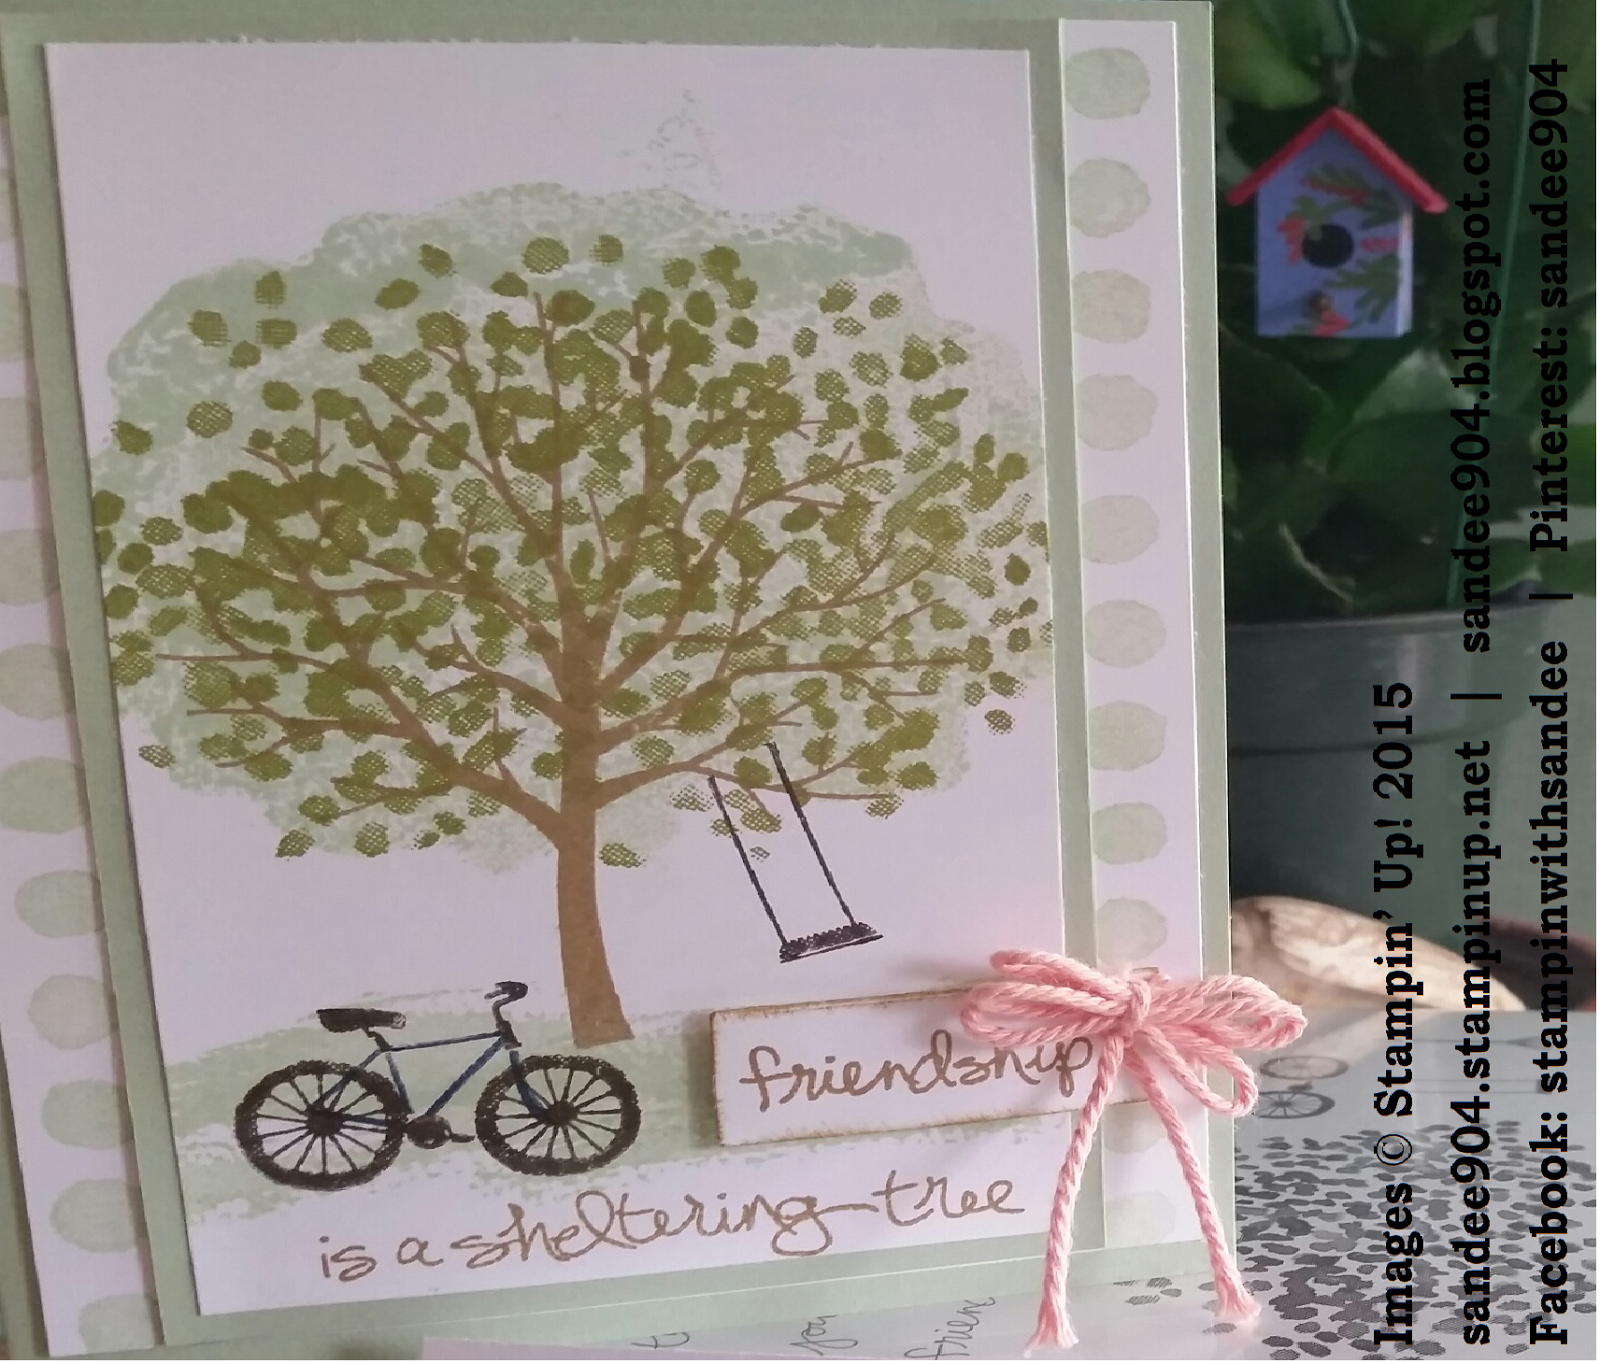
The Sheltered Tree stamp set I am using is a photopolymer set which allowed for some “reverse image” stamping. What is “reverse image” stamping you say? Well, just that – reverse the image! Adhere the detailed image side of the stamp to the clear block and ink the flat side, or the reverse side of the stamp, which created this wonderfully full-blooming tree effect (affectionately nicknamed the blob effect at club). I used 2013-15 In Color Pistachio Pudding (really going to hate to see this color retire in June!) for the full bloom effect. Clean the stamp and adhere the flat side of the image to a clear block and ink the intended leaf image in Old Olive. Line it up with the “blob” and stamp. Turned out nicely. The color for the tree trunk is 2013-15 In Color Baked Brown Sugar (pause for sadness to fade again). The tree swing and bicycle is stamped in Early Espresso. The bicycle frame is stamped in Night of Navy.

I decided to use the stamp set’s signature sentiment, “Friendship is a sheltering tree.” I love the sentiment, and really love the font! To keep to the design of the sketch challenge, I masked the sentiment and inked in Baked Brown Sugar the word “friendship.” Although it is hard to see, the word is cut out using the smallest banner die cut, some quick sponging of Baked Brown Sugar around the edges, and affixed to the right side of the card just below the swing. The bow is created with 3 loops using the Crisp Cantaloupe Thick Baker’s Twine. In this picture it hides the “flag” portion of the banner. Reversing the banner so that the flag pointed left instead of right would be a better choice.

To finish the card, I layered on slightly larger Pistachio Pudding card stock, layered again on Whisper White card stock (trimmed with a row of circles from the Painted Petals stamp set — my favorite Stampin’ Up! stamp set), and adhered to a Pistachio Pudding card stock base of 51/2 x 4 1/4.

If you would like specific dimensions and instructions to create your own card, please e-mail me and I will be happy to share them with you. And if you don’t already have a Stampin’ Up! demonstrator, it would be my honor if you selected me to help you in your future creations!

Stamp on!


Sandy
sandee904@yahoo.com

sandee904.stampinup.net  |  sandee904.blogspot.com
Facebook: stampinwithsandee | Pinterest: sandee904

Sunday, February 1, 2015

You Plus Me Stamp Set for Valentine’s Day

Here it is the first day of February and this is my first post of 2015. Already second guessing that new year’s resolution to be more committed to keeping everyone updated with my blog! Leave me a comment and let me know your paper crafting interests.

January club was held on Saturday the 17th. It was so good to see everyone and hear about their holidays.  We have a new club member, a recent transplant to the area who found us through Stampin’ Up. She is tried and true Stampin’ Up! She is a great addition to our group.

In addition to birthday cards, our focus was on Valentine’s day cards since February club falls on the Saturday after Valentine’s day. Here’s a picture of one of the two Valentine’s day cards we made.


The card is really simple to make. You will notice that we cut off the right side of the front of the card to showcase the white hearts on black designer paper from Stacked with Love Designer Series Paper Stack. The three (3) hearts strategically aligned along this “shortened” front are created from a truly handmade DSP using the Stripes Mask and punched with the Sweetheart Punch. In creating the DSP, I used the aqua painter and Crisp Cantaloupe Reinker on Whisper White cardstock, carefully turning the Stripes Mask to create the gingham look. (Everyone should write Stampin’ Up! to tell them to never retire the Stripes Mask. I LOVE IT! And you will too.)

The “Be Mine” sentiment is from the You Plus Me Stamp Set, I broke up the sentiment on two hearts punched from the smallest heart die in the Hearts Collection, and the tail of hearts are from the “scraps” of the handmade gingham DSP punched with the small heart in the Itty Bitty Punch Pak linked using Linen Thread, with small pieces of Linen Thread tied in a simple knot between each. I don’t think you can tell from the photo, but the Linen Thread is run between two hearts back-to-back using simply Snail Adhesive (I didn’t want to deal with excess glue on the small hearts).

Just a couple of strips of coordinating Stacked with Love Designer Washi Tape for the finishing touch.

I will share another Valentine’s day card soon so that you have a couple of options.

Stamp on!  Sandy

Find me at:
Stampin' Up! Website:  sandee904.stampinup.net

Email me at:
Email:  sandee904@yahoo.com

Find me at:
Facebook:  StampinWithSandee

Pinterest:  sandee904

Tuesday, December 30, 2014

Festival of Trees and Endless Wishes Stamp Sets Make this Festive Holiday Card

I hope your holiday has been great so far. The new year is just another day away. Better brush up on your new year’s resolutions!

My new year’s resolution this year is to be more active in blogging about my love for stamping. I am starting today! As you know, I am a Stampin’ Up! demonstrator. I have grown my base group of fellow stampers from one monthly workshop to a second group that meets every other month. They are a great group of people and have a special place in my heart.

Today, I want to share with my virtual followers the holiday card I created this year using Stampin’ Up! Festival of Trees Stamp Set from the Holiday Catalog (HC p. 24; note the bundle includes the Tree Punch). I decided to use a non-traditional green for the holiday trees on my card. The design needed to be simple in order to make multiple cards and, although it was fairly simple to put together, they turned out beautiful.

The color scheme is Pear Pizzazz from the Subtles Collection and Lost Lagoon from the 2014-16 In Color Collection. Feel free to save this color scheme for future inspiration.


These colors coordinate perfectly with the All is Calm Specialty Designer Series Paper from the 2014 Holiday Catalog (HC p. 22).


Stampin’ Up! identifies the colors that coordinate with the DSP in both the catalog and on the packaging. This is a great idea for planning purposes – and for your future projects – taking the guesswork out of color coordination. 

I prefer to use Whisper White for the base of my cards when I have a “heavy” card front so that I don’t have to add another layer to the inside of the card for the sentiment. Another layer might have tipped the scale on the postage meter which is not a good thing when the mailing list is long.

If you are not able to tell from the photo, the center tree is stamped and snipped separately from the others. I used the Tree Punch from the Holiday Catalog (HC p. 24) to speed up the process due to the number of cards I was making, but you can stamp and snip one just as well. The individual tree is lifted up from the card with Stampin’ Dimensionals. No punch necessary for the tree stand - a couple of straight snips will do if the images are stamped side by side alternating right-side up and right-side down on a 1/2” strip of Whisper White card stock. The photopolymer stamps make lining images up so easy.

Front of Card Sentiment:  I tried to change up the sentiments for variety. Sometimes I stamped the sentiment directly on the main image (see the square “very merry” card), or sometimes I stamped on the strip of DSP (see the circle “celebrate the season” card). Small changes that personalized each card! So simple.

Finishing touches:  I alternated between a Lost Lagoon 3/8” Silky Taffeta Ribbon (HC p. 22) bow or the Frosted Sequins (HC p. 22) with a 4 mm rhinestone from the Rhinestone Basic Jewels (AC p. 209) adhered to the 1/2" strip of Lost Lagoon behind the main image. The star that tops the lead tree is punched from Silver Glimmer Paper (AC p. 193) using the Star Punch from the Itty Bitty Accents Punch Pack (AC p. 222).

If you need the dimensions for the cuts, I would be happy to furnish detailed instructions. Just send me your request via email.

Please remember that there is only a short time left for ordering from the Holiday Catalog, or the Clearance Rack with up to 80% discounts on retired or about to retire product – January 5 is the last day! I noticed this morning that there are only a couple of items on the backorder report so put your order in today. Do not delay another minute. As always, I would be honored if you selected me as your demonstrator on your online order. You can find the online store through my Stampin’ Up! website (URL below).

Happy Holidays!  And see you next year.

Stamp on!  Sandy

PS: Check back on January 6th for news and updates regarding Sale-A-Bration and the release of the Occasions Catalog (formerly known as the Spring Catalog).

Email me at:
sandee904@yahoo.com

Find me at:
Stampin' Up! Web Page:  sandee904.stampinup.net  

Follow me at:
Facebook: stampinwithsandee  
Pinterest:  sandee904

Sunday, September 21, 2014

Time to Start Thinking About Those Holiday Cards

The holidays are right around the corner, but I am not nearly ready to get started. I will tell you who is ready – my friend and neighbor – and our guest stamper today. I won’t reveal her name, but she will know that this post is all about her!
This Saturday was our regular stamp club, and we made birthday cards, thank you cards, and cards welcoming fall, but my friend wanted to dive right into holiday card making. She has been regularly searching and posting her finds on Pinterest and this Saturday was her opportunity to get down to business--some card making business.
Her first card is this adorable snowman card crafted from three circle punches on the right edge and topped with a whimsical hat. Check out that scarf too!


Now, her second card is a real work of art! The card uses designer series paper with holiday designs on both sides and the inside of the card opens with a reverse-fold insert and a window to the stamped holiday sentiment. Isn’t this cool!

I hope these cards helped put you on track to designing your holiday cards.  Thanks for visiting.
Stamp on!  Sandy

You can also follow me at:
Stampin' Up! Website:  sandee904.stampinup.net
Facebook:  StampinWithSandee  |  Pinterest:  sandee904

Sunday, August 17, 2014

Polka Dot Pieces Stamp Set and Bird Builder Punch

After last month's club, I felt like we should get back to some old-fashion stamping.  I think you will like this one, especially the color scheme of 2014-16 Lost Lagoon, Calypso Coral, and Crumb Cake.

Polka Dot Pieces Stamp Set (AC p. 139) is a great combo stamp set that includes images that coordinates with Stampin' Up! punches, like several scallop circle punches, 1 3/4" and 1 1/4" (flowers, easy), the Elegant Butterfly Punch (makes butterflies, easy peasy), and the Bird Builder Punch (makes the bird, real cute too).

And the sentiment makes an awesome stem! (Sorry, Mrs. Hinni - my favorite English teacher - i. I had to start this sentence with an "and" because it needed it.)

The flower is built on a layer of Very Vanilla card stock, then a layer of Lost Lagoon card stock trimmed with the scalloped edge punch, a layer of Crumb Cake card stock trimmed with the scalloped edge punch, and adhered to a card base of Very Vanilla card stock, again, trimmed with the scalloped edge punch.  It is not very clear in this photograph, but with the front of the card trimmed with the scalloped edge punch, the inside of the card shows through and is trimmed with a piece of coordinating Flowerpot Designer Series Paper.

Finishing touch in the bottom right corner is the coordinating ribbon --- 3/8" Stitched Satin Ribbon in Lost Lagoon.

Let me know how you like this card.  If you need any of the supplies to make this card, I would appreciate it if you would select me as your Stampin' Up! demonstrator.  Visit my online store at sandee904.stampinup.net.

Sandy

Follow me at:
Facebook: stampinwithsandee  | Pinterest:  sandee904

Sunday, July 13, 2014

St. Louis Cards and Stamping Definitely Go Together

Wow, I can't believe it has been more than 2 months since the last time I posted!! Sorry for the delay.  It has been really busy, but 2 months?  Anyway...

****
This month’s club card is a tribute to my favorite baseball team – St. Louis Cardinals.  Go Cards!!

Converted this regular, but really cute bird from Stampin’ Up! bird builder punch, into my favorite red bird.  I think you will see that I snipped a piece from a second punch of the wing in Real Red Card Stock for the tuft of feathers on his head, and a couple of separate punches of the tail feathers for fluffier tail.

The fence is made from strips of Whisper White Card Stock.  I ran it through the Big Shot using the wood grain embossing folder to give it that real wood, whitewash look.

The birdhouse on top of the fence post is made from a small, rectangle piece of Whisper White Card Stock, with scraps leftover from the fence for the roof and the door is the new itty bitty heart punch.


Looks good.

Stamp On!  Sandy

Email:  sandee904@yahoo.com
Stampin' Up! Website:  sandee904.stampinup.net
Facebook:  StampinWithSandee
Pinterest:  sandee904

Monday, January 20, 2014

Happy New Year and Welcome Back...Hearts A Flutter Stamp Set and Coordinating Framelits Die Cut Collection

Hello, Stampers!  Finally getting things back to “normal” since the holidays. I can’t believe how busy things got there – complicated by the short time between Thanksgiving and the holidays. I just noticed that I never got around to posting a photo of my holiday cards and tags.


 This weekend was the first stamp club of the new year. Great to see everyone! Since there won’t be time to hold another workshop before Valentine’s day, that’s where we got started! Of course, there were loads of hearts stamped, punched, die cut and snipped, but I found fun in making the “love” die cut from Stampin’ Up’s Expressions thinlits die cut collection the focus of the card.


The large heart (from Hearts a Flutter Stamp Set and Framelits Die Cut collection) is cut from Pirouette Pink and stamped with In Color Strawberry Slush. I “found” the arrow just lying there in the “scrap” pile from punching multiple flags (extended flag right behind the large heart) one after another on a strip of Basic Gray. I LUV when that happens! From the right of the flag, it looks like hearts are shooting out in rapid succession, right? Second sample uses Marina Mist and Basic Gray for those non-traditional valentine’s day greetings.
As you know my sister, Cindy, is also a Stampin’ Up demonstrator. Since we don’t live close to each other, this year we are swapping our club cards for fun. I can’t wait to send her the January workshop card, and can’t wait to receive hers from this upcoming weekend.
I am thinking about participating in this week’s clean and simple challenge from The Paper Players (PPA179). It is a one-layer valentine card. If I have time yet today, I will finish it and get it posted right away.
I added a link to the recently released 2014 Occasions Catalog.  Take a moment to look through it.  Chock full of awesome new product, projects, and ideas.
Finally, I wanted to point out that Sale-A-Bration begins next week, January 28. This year Stampin’ Up! created six bundles of product (discounted and total right at or above $50); perfect to earn a Sale-A-Bration freebie. Please contact me ASAP to set your workshop date to get in on the great products available during this awesome sale. I need your help to meet my goal of reaching out to 100 new Stampin’ Up! “lovers”. Thank you all for your support and being my cheerleaders.


Stamp On!
Sandy

Tuesday, December 10, 2013

PPA182 Color Challenge and Sketched Birthday

Happy Holidays!! 

Things have really been busy over the last several weeks getting ready for the holidays, but there are more than holiday cards to make and holiday parties to attend. There are birthday cards and birthday parties too!

I haven't participated in a card challenge in several weeks and found inspiration for this birthday card with Pals Paper Arts color challenge PPA182.  Here's a picture of my card.

I tried to make do without sunlight in taking a picture of my card, but I am not pleased with the results. My apologies.

The color scheme is Elegant Eggplant, the new Smoky Slate, and Very Vanilla.


I have faith that you could replicate this card very easily, however, if you need the paper dimensions, etc., please contact me. I will be happy to send that to you. It may be hard to see from the photo that I used a piece from the Neutrals DSP Stack in Very Vanilla right behind the Chevron Smoky Slate Ribbon. I felt it helped to bring together the white in the ribbon with all the Very Vanilla.  To complete the card you will need these accessories: Scallop Circle 1 3/4", Framelits Circles Collection #4 from the center, Regals Candy Dots (Elegant Eggplant), 3/4" Chevron Ribbon (Smoky Slate), and Stampin' Dimensionals.

Please leave me your comments and share your cards and questions with me.  I will be happy to help.

Stamp on!

Sandy
sandee904@yahoo.com

Saturday, October 19, 2013

Best of Autumn and My First Sketch Challenge – PPA176 Sketch Challenge

I follow the blogs of several other Stampin’ Up! demonstrators. Everyone is so positive and I find that they are the most absolutely helpful people and so inspiring.  In fact, they have been inspired me to participate in Pals Paper Arts sketch challenge AND submit it! Here is my entry. I hope you like it!


And here is Margaret Moody’s design:


Wow!  Right?  Angles are tough, too.

This was a perfect opportunity to incorporate the Stampin’ Up! Best of 25 stamp set Best of Autumn. And what goes better with a fall-themed stamp set than Sweater Weather DSP! Sweater Weather color scheme includes several neutrals and the re-introduced Crushed Curry! LUV Crushed Curry CS.

Although it is not a requirement, it was important to me to stick to Margaret Moody’s design as close as possible. Of course, if you look closely, you will see some slight deviations. I have decided not to point them out. :) It is sort of hard to see, but I think you can see that after I cropped the leaf, it didn’t quite look right so I added a layer of Soft Suede and cropped it along the same lines of the leaf. Oh, I almost forgot to point out the bird in the stamped image from Four Frames stamp set did not stop me from using it on this card – I turned it upside down and the bird is hiding behind the leaf!

Stamp Sets:  Best of Autumn, Four Frames  Paper:  DSP Sweater Weather, Soft Suede, Crushed Curry, Very Vanilla  Ink:  Soft Suede  Accessories:  Stampin’ Dimensionals, Small Scallop Stampin’ Trimmer Rotary Cutting Blade, Boho Blossoms Punch, Decorative Label Punch, Pearl Basic Jewels (5mm)

Thanks for visiting my blog today.

Keep on stampin’ on!  Sandy