Showing posts with label Stampin’ Up. Show all posts

Thursday, May 17, 2018

Father's Day Truly Tailored Card Recipe and Tips

Yesterday on the Blog Hop with several Stampin' Up! demonstrators, I shared my Father's Day card featuring the Truly Tailored Bundle and the True Gentlemen Designer Series Paper (DSP) and Buttons. I sure hope you enjoyed the blog hop. What a great group of ladies in this Blog Hop. They all love to share everything Stampin' Up! As promised, today I am sharing my tips and tricks for my card.


My goal is to utilize every inch of the DSP drives every cut of my DSP. Cutting this piece of the DSP at 4" x 3" will give you 12 card fronts (2 cuts of 4" down from the top and 3 cuts of 3" across from the side). The Dapper Denim piece is 4" x 2 1/4" so this layer totals 4" x 5 1/4". Then emboss using the Simple Stripes Textured Impressions Embossing Folder (TIEF).

To make the cute embellishment, after stamping the sentiment from the Truly Tailored stamp set i
n Dapper Denim on Very Vanilla Card Stock, instead of centering the sentiment in the Tailored Tag punch window, move the upper edge of the image for a cut that does not allow as much "white space." Maybe this picture will help.


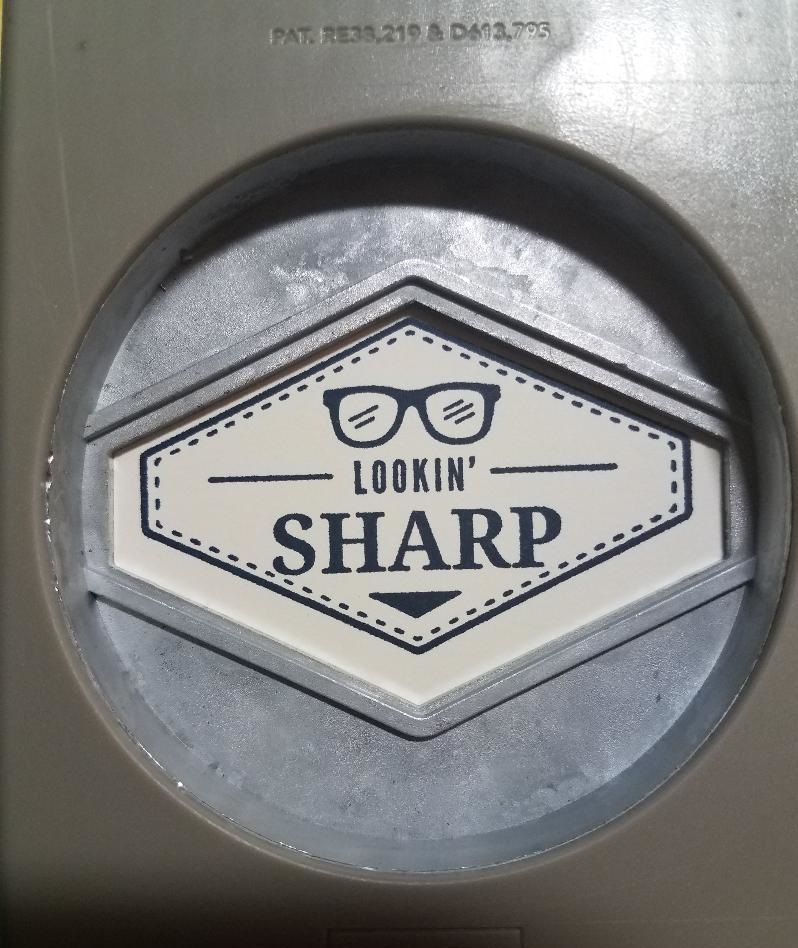
Then adhere a scrap piece to the back of the sentiment for a "handle" and punch the lower edge of the sentiment close with a similar "white space" edge,


Then snip both sides to make the "white space" even around the sentiment.


Adhere to a full punch of Dapper Denim and stack on dimensionals with a twist of Burlap Ribbon. I secured the ribbon with small glue dots.

Finally, for the "Dad" flag, stamp on a strip of Dapper Denim, adhere to a slightly larger strip of Very Vanilla and flag both ends pushing the strip through the top of the Tailored Tag punch, line it up evenly (as shown, looks like a little house, right?) and punch.


So two additional uses for the Tailored Tag Punch. Yay! Then adhere a couple of the small True Gentlemen Buttons and this card is all set!!

I really hope you enjoyed my card and the Blog Hop See you next Wednesday for another new card.


Stamp On!!

Sandy
#StampinUp30

sandee904@yahoo.com
sandee904.stampinup.net | sandee904.blogspot.com

Facebook: stampinwithsandee | Pinterest: sandee904


Wednesday, May 16, 2018

Father's Day Blog Hop Featuring Truly Tailored Bundle


Welcome to the Father's Day Blog Hop! I am participating again in a blog hop with fellow Stampin' Up! demonstrators from all over the United States, Canada, United Kingdom and Australia! You might be starting the blog hop right now, or you maybe coming from Emilie Poncelet's blog. Welcome one and all. The theme for our blog this month is to create a card or project for Father's Day. Here in the States, that is celebrated on June 17th.


My card features the Truly Tailored bundle and the True Gentlemen DSP (Designer Series paper) from the Occasions catalog. The stamp set and the DSP will no longer be available after May 31, but the Tailored Tag Punch will carry over. Did you happen to notice the other use for this punch on my card? The top point of the punch is used to create the flag on the Dad banner (see next image). This punch will make an awesome addition to your collection and complement the Banner Triple Punch for all your flags! Check back tomorrow for some quick tips on making the Dad banner.

Although Night of Navy was one of the featured colors in the DSP, I love the way Dapper Denim brings this card together. And how about the large, all caps "DAD." I love one word sentiments, especially when they are in large fonts -- and maybe it is just because they are more pleasing to my aging eyes.  Here's a quick peek at the inside of the card.


Leave a comment below with a trail to find you. I would be interested in seeing your creations. 

Thank you for stopping by my blog today! Make sure you keep hopping along to see all the other great cards and projects. Click on the "Next" button below to visit Melanie Coverston's blog.


This is a full list of our bloggers this month:


Sandy Ward, USA  [You Are Here]


Stamp On!!

Sandy
#StampinUp30

sandee904@yahoo.com
sandee904.stampinup.net | sandee904.blogspot.com
Facebook: stampinwithsandee | Pinterest: sandee904

Sunday, October 25, 2015

Halloween Greetings with If the Broom Fits paired with Sheltering Tree stamp sets

I am off schedule a bit for posting this month’s feature card. No excuse for that except it has been a busy month.

This month’s club featured fall and Halloween cards. Today we will shine the spotlight on the adult humor of Stampin’ Up stamp set, If the Broom Fits.  I loved the sentiment, “If the broom fits, ride it” but I was having difficulty with taking this up a level from just stamping the image, framing it on DSP and adding a ribbon. I found a cute card on YouTube by SU demonstrator Janet Wakeland, which we cased with some small variations. You can see her card and video here.  https://www.youtube.com/watch?v=LhYXTqNJDYk  This is our interpretation.

Then this weekend while I was catching up on the blogs I follow, I found inspiration from SU demonstrator Brian King and recent card created with the Sheltering Tree stamp set – which is my favorite stamp set! For my card, start with stamping the tree image in Early Espresso Classic. Create the foliage with stamping the reverse of the leaves image in Hello Honey Classic Ink and then the leaves in Cajun Craze Classic Ink. Next mask off and stamp one (1) broom (hard to pick just one) in Early Expresso above the tree and color with Stampin’ Write Markers (I used Pumpkin Pie and Crumb Cake). Before the next step, stamp in 2015-17 Mossy Meadow Classic Ink the ground effects image multiple times. (I tried Early Espresso on my first draft, however, IMHO it made the card look too, too drab.)

I have really started to get the hang of creating sky backgrounds. The next step is very important, using a clear wax crayon (you know, the kind you get in an dye kit) carefully trace along the outside edges of the tree, leaves and ground and cover the broom entirely. This way, when you sponge the sky, you can get closer to these images without altering the color. I used Pacific Point Classic Ink first to completely cover all the white remaining on the card front, followed by a small amount of Night of Navy Classic Ink towards the top of the card. If it "bugs" you, use the heat gun for a bit to remove any remnants of the wax crayon.

The moon is a circle (#4 from the center of the CirclesCollection dies) in Hello Honey after masking and stamping the first part of the sentiment. Be sure to leave some room for a small bit of the broom to give the illusion that a witch is racing across the sky in front of the moon. Line up the broom on the moon with the broom on the card and pop up with Stampin’ Dimensionals. (If you are certain of your placement, you could inlay the moon, but I liked the dimension added effect.) Stamp the rest of the sentiment, “ride it,” on a Whisper White and short punch with the Word Window Punch. Place it on the broom stick.

Finishing touches. The house is cut free hand from a scrap (about 1” by 3”) of Basic Black, and some strategically placed bats using Stampin’ Write Marker in Basic Black.

Love to see your samples. Send me an email.

Stamp on!

Sandy
sandee904@yahoo.com

sandee904.stampinup.net | sandee904.blogspot.com
Facebook:  stampinwithsandee | Pinterest:  sandee904

Sunday, September 21, 2014

Time to Start Thinking About Those Holiday Cards

The holidays are right around the corner, but I am not nearly ready to get started. I will tell you who is ready – my friend and neighbor – and our guest stamper today. I won’t reveal her name, but she will know that this post is all about her!
This Saturday was our regular stamp club, and we made birthday cards, thank you cards, and cards welcoming fall, but my friend wanted to dive right into holiday card making. She has been regularly searching and posting her finds on Pinterest and this Saturday was her opportunity to get down to business--some card making business.
Her first card is this adorable snowman card crafted from three circle punches on the right edge and topped with a whimsical hat. Check out that scarf too!


Now, her second card is a real work of art! The card uses designer series paper with holiday designs on both sides and the inside of the card opens with a reverse-fold insert and a window to the stamped holiday sentiment. Isn’t this cool!

I hope these cards helped put you on track to designing your holiday cards.  Thanks for visiting.
Stamp on!  Sandy

You can also follow me at:
Stampin' Up! Website:  sandee904.stampinup.net
Facebook:  StampinWithSandee  |  Pinterest:  sandee904

Saturday, May 3, 2014

Happy Mother's Day - My Mother Stamp Set

April Stamp Club was reserved for making Mother’s Day cards. I had already posted the card my sister Cindy designed back in February using the My Mother Stamp Set for the Spring Catalog. I think you will remember it – she used the masking tape technique for adding the splashes of color. I put together packets for making her card. Beautiful.
I created a separate Mother’s Day card using the same stamp set. It is a top-fold card with a diagonal cut on the front to showcase the insert – a sheet from the Fresh Prints Designer Series Paper Stack (also available in the Spring Catalog); trimmed using the Scallops Framelit. Trim the DSP piece 1/4+” (which means, mathematically, a “smidge” more) to just fit within the 4 1/4" x 5 1/2" frame of the base card and adhere the scrap piece you have just created for the left edge of the card, trimming the excess for a perfect fit. Also, I punched 2 scallop circles in Pool Party and Real Red to separate the totally awesome flower made with the new Spiral Flower Originals Die (seriously, you need to buy this – AND the Fringe Scissors!). And, there are a couple of sprigs from the Bird Builder Punch. I hope you like this card; it was fun to make.


Oh, and the paperclip was created using another another piece of the scrap, wrapped around the top end of the clip and (hard to see) snipped with a flag trim on the end.
Couple of points I wanted to make once you see the picture.  1) The color is totally off in this picture.  It looks like the base card could be a gray, or even white, but it was Pool Party to coordinate with the DSP.  2) I added a "tail" to the back of the card in order for it to "stand" on its own.
We also made some birthday cards with the Happy Watercolor Stamp Set, Springtime Hello Stamp Set and Vivid Vases Stamp. There was something for everyone!
Stamp On!  Sandy
Email:  sandee904@yahoo.com
Stampin' Up! Website:  sandee904.stampinup.net
Facebook:  StampinWithSandee
Pinterest:  sandee904

Sunday, March 30, 2014

Petal Parade Stamp Set and Sweet Sorbet DSP

This month’s club card was a rocket-fast card made with a wide slip of Designer Series Paper (DSP) from the Sweet Sorbet DSP (offered in the Sale-A-Bration catalog), a couple of die cuts and punches, a flower image from the Petal Parade stamp set (also found in the Sale-A-Bration catalog), and sentiment from Itty Bitty Banners.


At first I was not in love with the Petal Parade Stamp Set offered by Stampin’ Up! as one of several free product with every $50 purchase. I think you will agree that this is going to make a swell addition to your collection of stamp sets like everything else by Stampin’ Up! The best part, of course, is the coordination of stamp sets to DSP or die cuts, and this stamp set coordinates with another free product in the Sale-A-Bration catalog, Sweet Sorbet DSP. Delicate colors that will complement your spring projects using the 2013-15 In Colors (Crisp Cantaloupe and Pistachio Pudding), 2012-14 In Colors (Summer Starfruit), and everyone’s staple, Pool Party from the Subtles Collection.

Behind the stamped flower image you will recognize the Blossom Punch. The flower image is cut out using the Circles Collection Framelit (#4, I believe), and centered on a complete punch of Crisp Cantaloupe with the Blossom Punch. The second Blossom Punch of Summer Starfruit cut into 6 pieces and centered between each petal of the first flower. Finished with Pistachio Pudding leaves on stems using the Bird Builder Punch.

If you need dimensions or detailed instructions, let me know, and I’d be happy to send them out to you. Send an email or message me below.

It is unfortunate that Sale-A-Bration ends tomorrow, March 31, but all good things must come to an end, right! Still time to place an order. Please visit my online store – the quickest way to get there is to go to my Stampin’ Up! webpage and click the link to SHOP NOW. This way you can be sure that I am selected as your demonstrator. I certainly appreciate your order. And I appreciate your comments, too! Please leave me your comments. Let me know what you would be interested in seeing more of, less of, anything.

Also still time to join my Stampin’ Up! team for $99 during Sale-A-Bration (thru March 31, 2104). YOU will select $150 worth of product for your starter kit, and can start earning your product, learning some great craft ideas, and meeting some great people that turn into great friends!

Stamp On!  Sandy

Email: sandee904@yahoo.com
SU Website: sandee904.stampinup.net
Facebook: stampinwithsandee
Pinterest: sandee904 

Sunday, March 9, 2014

Luck of the Irish to Ya

Just a short note to wish everyone a happy St. Patrick’s Day! Since it is less than a week away, I was thinking that we should include a quick and easy card to celebrate the day.

I LUV the new Decorative Dots Textured Impressions Embossing Folder.  It makes a great background on this card.

The tag from Chalk Talk Framelits die cuts makes it easy to draw your focus to the shamrock made from 4 small hearts (small heart punch) out of 2012-14 In Color Gumball Green.

If you are celebrating the Feast of Saint Patrick next Monday, enjoy and be safe.

Stamp on!  Sandy O'

Images (c) Stampin' Up! 2014
sandee904.stampinup.net  |  sandee904.blogspot.com

Facebook: stampinwithsandee  | Pinterest:  sandee904


Monday, March 3, 2014

Sketched Birthday - FMS125

This weekend was busy, busy, busy.  Went to my dear friend Audrey’s bridal shower on Sunday.  It was fabulous.  I hope yours was excellent.  Now down to business.
Today I am posting to enter this card into the Freshly Made Sketches Card Challenge, here’s my entry.

And here's the sketch...


At first glance, this sketch looks like it will be simple to pull off.  However, to get the large background layer (whether simple CS or DSP), to coordinate with the embellishment in the left corner was not easy. 

This week is my brother-in-law Glenn’s birthday so he should NOT be reading my blog today or he will have an early glimpse of his birthday card. After I was done, I thought maybe I should not have used Smoky Slate card stock and DSP since he lives in Pennsylvania.  I hope this brings a smile.
Stamp on!  Sandy

Saturday, February 22, 2014

My Mother Stamp Set

Just a quick update today. Now don't freak out because Mother's Day is not until May, but I wanted to share this adorable, clean and simple card my sister, Cindy, made using the masking tape technique to add splashes of color. Just beautiful, Sis.


If you live in the Kansas City, Missouri area, you should look her up and join her stamp club. They meet once a month on Fridays (sorry, I don't know her exact schedule).

My stamp club meets the 3d Saturday of the month.  See you on March 15th.  

Stamp on!  Sandy


Images (c) Stampin' Up! 2014  |  sandee904.stampinup.net

Facebook:  stampinwithsandee
Pinterest:  sandee904

Sunday, February 9, 2014

Friendship? Yes, please. From My Heart Stamp Set

Charles Dickens.  Stampin' Up! has collected several beautiful sayings in a stamp set called From My Heart (Annual Catalog, p. 99). This month, instead of the normal Valentine's colors of pink and red, we will step outside of the box and use orange and blue (Tangerine Tango and Tempting Turquoise). The card will be featuring Mr. Dickens' quote complemented by the Gorgeous Grunge stamp set (p. 109). The splatters of blue give the card an eclectic feel, or shabby chic as they say.


I bought the White Tea Lace Paper Doilies (item #129399) several months ago, but hadn't quite found the right card for it. I think the paper doilies can really make a shabby chic card! I wasn't happy with plain white so I sponged with Tempting Turquoise ink and I think it truly makes the card pop now.

If you need dimensions or detailed instructions, please send me an email and I'll email a pdf to you.

Don't forget that Sale-A-Bration runs through March 31. This is a great time to hold a party or make an individual purchase since for every $50 you spend, you can select a FREE item from the brochure that is not yet available in current catalogs or online. If your party sales reach $300 or more, in addition to the $50 in hostess dollars, you will receive an additional $30 in hostess dollars. That is $80 in FREE product! Click the link to the right to view the brochure.


If you join my Stampin' Up! team for $99 during Sale-A-Bration (thru March 31, 2014), YOU will select $150 worth of product for your starter kit, and can start earning your product, learning some great craft ideas, and meeting some great people that turn into great FRIENDS!

Stamp on!

Sandy

Images (c) Stampin' Up! 2014
sandee904.stampinup.net | sandee904.blogspot.com

www.facebook.com/stampinwithsandee
http://pinterest.com/sandee904

Friday, January 31, 2014

Stampin' Up! Sale-A-Bration is Underway...

Once again it is time for Stampin' Up!'s BIGGEST sale of the year. For every $50 you spend, you will receive a free Sale-A-Bration gift.  You can find a link to the brochure when you shop at my online store at sandee904.stampinup.net, or you can click the image to the right.


Now I don't want to sound like there is any rush, but please hurry and book your party right away so I can make sure that everyone has the opportunity to get in on the BIGGEST sale of the year. Plus, if your party sales reach $300 or more, in addition to the $50 in hostess dollars, you will receive an additional $30 in hostess dollars. That is $80 in free product.

I know some of you regularly spend an average of $75 an order. If you join my Stampin' Up! team for $99 during Sale-A-Bration (thru March 31, 2014), YOU will select $150 worth of product for your starter kit, and you can start earning your product, learning some great craft ideas, and meeting some great people that turn into great friends!

Please contact me to learn more details.


Stamp On!


Sandy


sandee904.stampinup.net  |  sandee904.blogspot.com