Saturday, October 31, 2015

Happy Birthday Everyone Trifold Card

Special request by the Joyner group of ladies…Trifold card challenge!

Now I have never made a trifold card before so I went to Pinterest and Facebook for ideas and nothing really seemed, well, do-able. My personal challenge was to use only supplies on hand, which included only using 8 1/2" by 11” card stock, and not use flowers. Here’s my card.

Finishing touches. What sets the card apart from others is the Cherry on Top Designer Washi Tape and the Dazzling Details (glitter) on the stars.

Difficulty level: Medium skill level

I think it was a big hit. It is versatile too as you can use any large font sentiment for the front of this card. I created a card recipe that I will send you for free with your product purchase totaling $50 or more (excluding shipping/handling/taxes) from my online storesandee904.stampinup.net. My personal offer to send you the card recipe will end on November 30, 2015. Please be sure to check the box that I am allowed to contact you when you place your order, otherwise, I will not have your address to mail your goodies out to you.

Love to see your samples. Send me an email.

Stamp on!

Sandy
sandee904@yahoo.com

sandee904.stampinup.net | sandee904.blogspot.com
Facebook:  stampinwithsandee | Pinterest:  sandee904
Sunday, October 25, 2015

Halloween Greetings with If the Broom Fits paired with Sheltering Tree stamp sets

I am off schedule a bit for posting this month’s feature card. No excuse for that except it has been a busy month.

This month’s club featured fall and Halloween cards. Today we will shine the spotlight on the adult humor of Stampin’ Up stamp set, If the Broom Fits.  I loved the sentiment, “If the broom fits, ride it” but I was having difficulty with taking this up a level from just stamping the image, framing it on DSP and adding a ribbon. I found a cute card on YouTube by SU demonstrator Janet Wakeland, which we cased with some small variations. You can see her card and video here.  https://www.youtube.com/watch?v=LhYXTqNJDYk  This is our interpretation.

Then this weekend while I was catching up on the blogs I follow, I found inspiration from SU demonstrator Brian King and recent card created with the Sheltering Tree stamp set – which is my favorite stamp set! For my card, start with stamping the tree image in Early Espresso Classic. Create the foliage with stamping the reverse of the leaves image in Hello Honey Classic Ink and then the leaves in Cajun Craze Classic Ink. Next mask off and stamp one (1) broom (hard to pick just one) in Early Expresso above the tree and color with Stampin’ Write Markers (I used Pumpkin Pie and Crumb Cake). Before the next step, stamp in 2015-17 Mossy Meadow Classic Ink the ground effects image multiple times. (I tried Early Espresso on my first draft, however, IMHO it made the card look too, too drab.)

I have really started to get the hang of creating sky backgrounds. The next step is very important, using a clear wax crayon (you know, the kind you get in an dye kit) carefully trace along the outside edges of the tree, leaves and ground and cover the broom entirely. This way, when you sponge the sky, you can get closer to these images without altering the color. I used Pacific Point Classic Ink first to completely cover all the white remaining on the card front, followed by a small amount of Night of Navy Classic Ink towards the top of the card. If it "bugs" you, use the heat gun for a bit to remove any remnants of the wax crayon.

The moon is a circle (#4 from the center of the CirclesCollection dies) in Hello Honey after masking and stamping the first part of the sentiment. Be sure to leave some room for a small bit of the broom to give the illusion that a witch is racing across the sky in front of the moon. Line up the broom on the moon with the broom on the card and pop up with Stampin’ Dimensionals. (If you are certain of your placement, you could inlay the moon, but I liked the dimension added effect.) Stamp the rest of the sentiment, “ride it,” on a Whisper White and short punch with the Word Window Punch. Place it on the broom stick.

Finishing touches. The house is cut free hand from a scrap (about 1” by 3”) of Basic Black, and some strategically placed bats using Stampin’ Write Marker in Basic Black.

Love to see your samples. Send me an email.

Stamp on!

Sandy
sandee904@yahoo.com

sandee904.stampinup.net | sandee904.blogspot.com
Facebook:  stampinwithsandee | Pinterest:  sandee904

Wednesday, September 2, 2015

Stampin’ Up! 2015 Holiday Catalog – Homemade for the Holidays

Yesterday was the release of the Stampin’ Up! 2015 Holiday Catalog. Already a hit in my book. I know, I know – fall holidays are the theme and the most important aspect of the catalog, but there are three very important product releases in the Holiday Catalog that are crafting gold to my crafting friends. Definitely must haves.

#1 – Stampin’ Up! Basic Black Archival Ink Pad, page 19 (Item #140931, $7). There are 51 pages of absolutely marvelous products, stamp bundles, and holiday project ideas. Tucked in the bottom left corner of page 19 – there it is. Stampin’ Up! has developed a permanent black ink. Perfect for watercoloring, which seems like a fad that is going to last for quite a while.


#2 – Precision Base Plate, page 14 (Item #139684, $25). With all the intricately detailed thinlits, this is a must have. This is a steel plate for use with your Big Shot™ that will improve the cuts of the more detailed dies. The “sandwich” recipe: Multipurpose Platform, Precision Base Plate, single sheet of cardstock, die, and Standard Cutting Pad. Not recommended for use with the “open” or border dies as the rigid plate may cause those dies to warp. Check out the video Stampin’ Up! released on YouTube for more detailed instructions, tips and tricks.

#3 – Fine-Tip Glue Pen, page 43 (Item #138309, $7). This is exactly what was needed for adhering small embellishments, like sequins or the images created with the intricate word die cuts, the butterflies, etc. The cap has a needle-like center that inserts into the tip of glue bottle that will prevent clogging.. Check out the video Stampin’ Up! release about using the Fine-Tip Glue Pen and properly capping the bottle.

Over the next several weeks, I will showcase here some of the stamp sets and oodles of bundles to help create any of your papercrafting holiday projects. Our first project will be the tags using the Oh, What Fun Stamp Set (Item #140386, $21) and Oh What Fun Tag Project Kit (Item #139602, $21) on page 5. See you at club this month! I cannot wait.


Stamp on!

Sandy
sandee904@yahoo.com

sandee904.stampinup.net  |  sandee904.blogspot.com
Facebook:  stampinwithsandee  |  Pinterest:  sandee904


Wednesday, August 5, 2015

All About Sugar Stamp Set and Fry Box Bundle Treat Bags

Today we will be making these cute treat bags. 

On page 61 of the new 2015-16 Annual Catalog, Stampin’ Up! offers the All About Sugar Stamp Set in photopolymer and the Fry Box Bigz L Die (p. 175) at a 15% discount if you bundle these fantastic 2 products. Incredible savings to make this super cute treat bag in the shape of a fry box – just like the ones your favorite fast food comes in.

There is absolutely not much work involved in putting together this project. Run a half sheet of card stock through your Big Shot™ using the Fry Box Bigz L Die. On my project, I used a piece of Tangerine Tango card stock for the fry box and stamped the images on Whisper White card stock – fussy cutting the images with a very, very slight border of the Whisper White. It would have been awesome to have a punch or die cut for these smaller images, but the fry box was the way to go.

I wish I could give credit to the demonstrator’s video I saw many weeks ago – I am sorry, I do not remember her name any more – where she folded the card stock in half instead of laying the half sheet across the whole die in order to allow identical dimensions for the front and back of the box. This change allows you to punch the “handle” using the Large Oval punch as you can see in the photo of my project. I also used the Extra Large Oval punch by accident on one of the fry boxes. I am not so sure I like it as well as the Large Oval punch. But that is the beauty of paper crafting – you get to make your own choices.

Most importantly, please be sure to use a strong adhesive, like the new Tear and Tape Adhesive (p. 156, $7.00) to secure the sides of the fry box. Then you will be assured that your treat bag will not fall apart on your recipient!

I challenge you to make one of these adorable Fry Box treat bags yourself. In fact, if you purchase:
  1. One (1) All About Sugar Stamp Set and Fry Box BigzL Die Bundle (p. 61, Item #140221, $42.50);
  2. One (1) Tangerine Tango Classic Stamp Pad (p. 138, Item #126946, $6.50); and 
  3. One (1) bag of the Mini Clothespins (p. 160, Item #133764, $4.00)
from my online store at sandee904.stampinup.net only, I will send you via regular U.S. mail one (1) half sheet of Tangerine Tango Card Stock, one (1) half sheet of Whisper White Card Stock, and the 2 pieces of ribbon (both ribbon shown are retired now so this will be while supplies last or through expiration of this offer) which will be enough to make one of these cuties yourself.

Now hurry, because you must place your order at my online stone before the end of the day on August 31, 2015 when this offer will expire. Please be sure to check the box that I am allowed to contact you, otherwise, I will not have your address to mail your goodies out to you.


And, if you already have the All About Sugar stamp set or the Fry Box Bigz L die cut, I will still honor my offer as long as you place an order through my online store at sandee904.stampinup.net for any product totaling $50 or more (excluding shipping, handling, taxes).

Difficulty Level: Easy  (I finished both fry boxes last night in about 45 minutes. I have no doubt that you can do the same.)

Stamp on!

Sandy
sandee904@yahoo.com

sandee904.stampinup.net  |  sandee904.blogspot.com
Facebook:  stampinwithsandee  |  Pinterest:  sandee904


Sunday, June 14, 2015

Sheltering Tree Stamp Set by Guest Designer

Yesterday was Andrea’s stamping party. It was really a card buffet, but I think I have some new stamping addicts! It was a fun time with a great group of people. I was amazed at the talent of the three (3) young stampers – Andrea’s niece and her third (we think) cousins. I had several cards designed for the adults and youngsters and a couple of cards designed specifically for the youngsters for father’s day. They did a marvelous job with the cards and made them their own.

On this day, Andrea was on a mission! She was on a mission to create a card using the Sheltering Tree Stamp Set by Stampin’ Up! Her vision was to cover the tree with embossed flowers (using the leaves image) on a sheet of vellum. It turned out beautiful. Tell her how much you LUV it below.

Of course, I couldn’t have a stamping party at Andrea’s without bring her favorite retired Stampin’ Up! stamp set, Because I Care. I didn’t have a card designed though – I left it to Andrea to come up with something herself. I had no doubt that she could handle it. Here’s her card.

I hope you enjoy Andrea’s cards as much as I did. I will post June’s club card next week.


Stamp on!

Sandy
sandee904@yahoo.com

sandee904.stampinup.net  |  sandee904.blogspot.com
Facebook:  stampinwithsandee  |  Pinterest:  sandee904

Sunday, April 19, 2015

Sheltering Tree Stamp Set for FMS182

In my last post, I mentioned that we would be using the Sheltering Tree Stamp Set from the Stampin’ Up! 2015 Occasions Catalog and the Scallop Tag Topper Punch for this month’s club card. Well, it has been a busy month for me and by Friday night I still hadn’t gotten my act together for club on Saturday. I needed some inspiration! Once I saw the sketch challenge from Freshly Made Sketches – “EUREKA!” I knew that was it. Try as I might, I was unable to incorporate the Scallop Tag Topper Punch into the sketch. (Never fear, it will return because you know I love cards with tags!!) Now, back to business.

Rita, a member of the design team at Freshly Made Sketches, has come up with a beautiful “clean-lined” design. Here it is…


Now here’s my card...


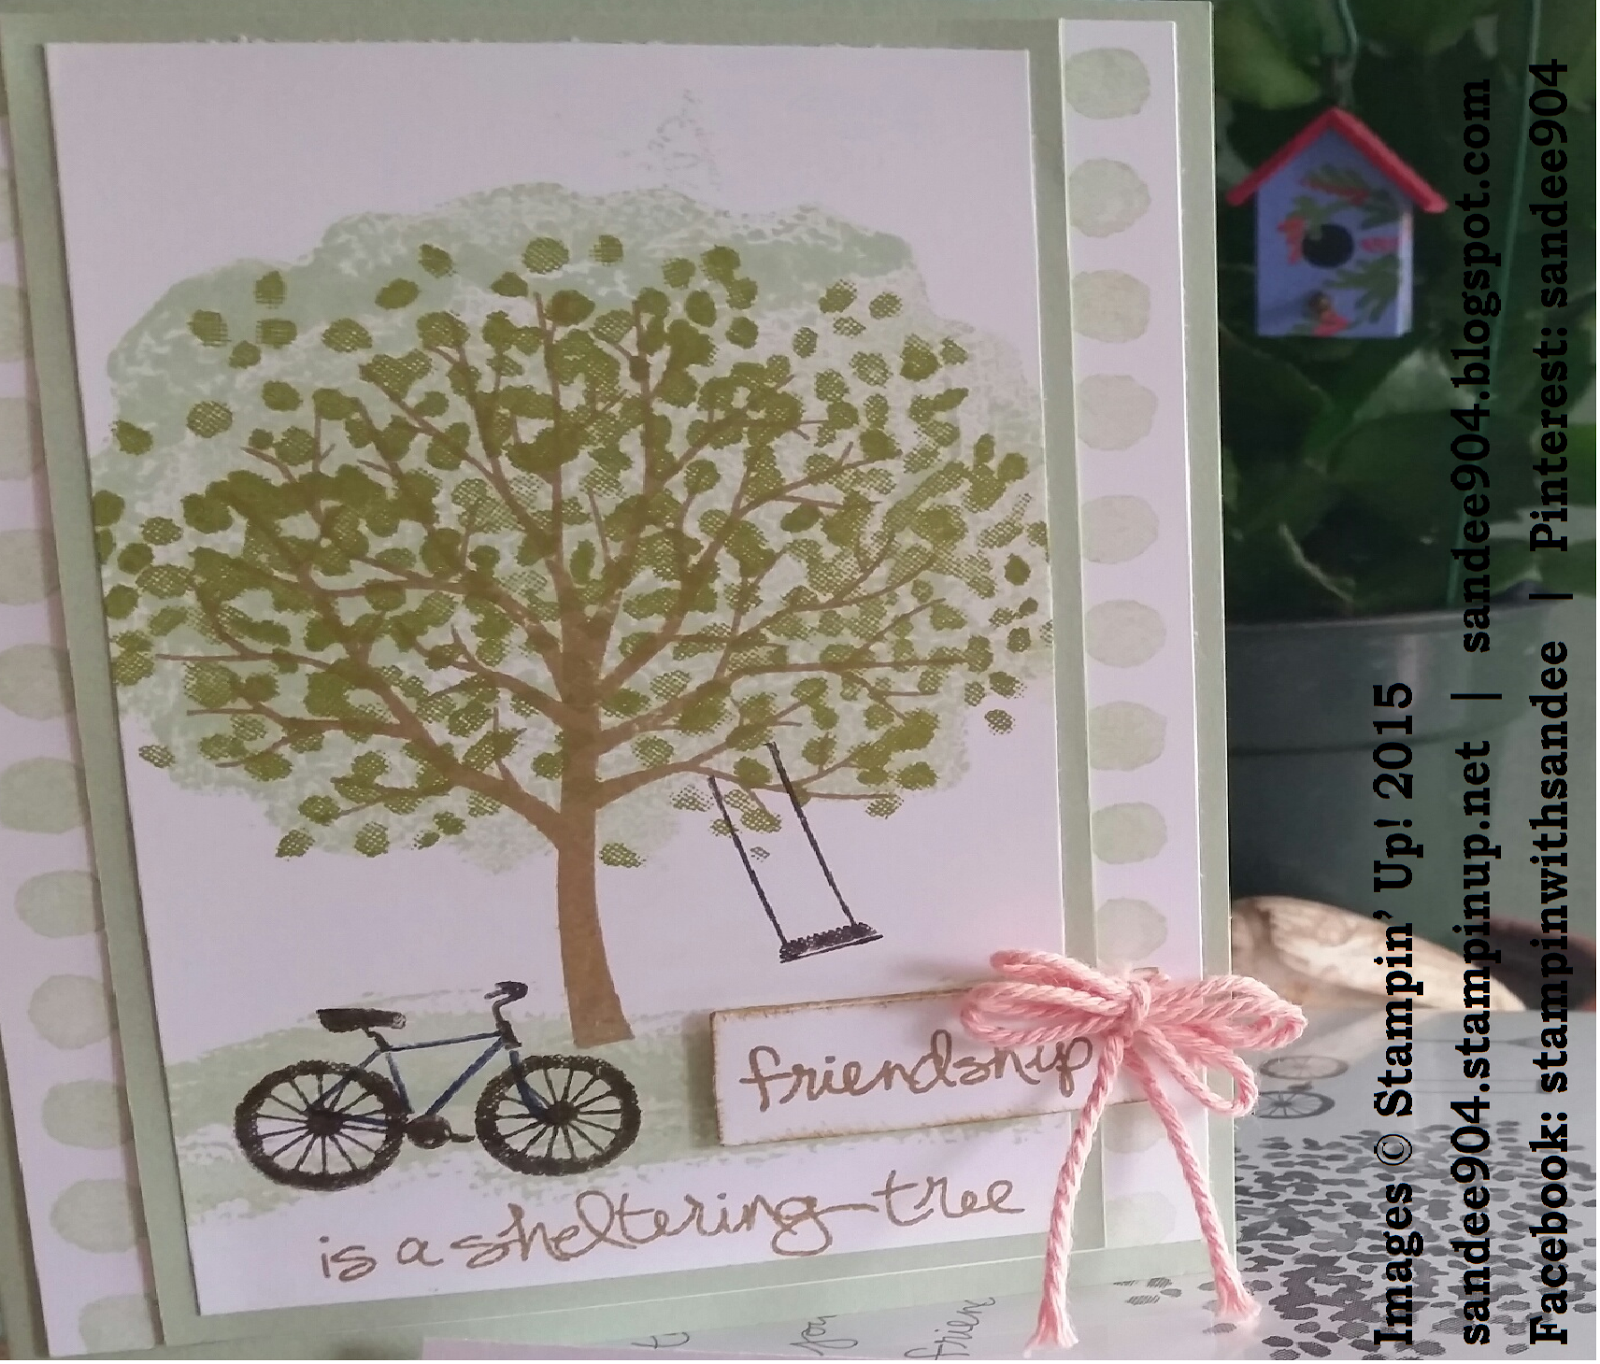
The Sheltered Tree stamp set I am using is a photopolymer set which allowed for some “reverse image” stamping. What is “reverse image” stamping you say? Well, just that – reverse the image! Adhere the detailed image side of the stamp to the clear block and ink the flat side, or the reverse side of the stamp, which created this wonderfully full-blooming tree effect (affectionately nicknamed the blob effect at club). I used 2013-15 In Color Pistachio Pudding (really going to hate to see this color retire in June!) for the full bloom effect. Clean the stamp and adhere the flat side of the image to a clear block and ink the intended leaf image in Old Olive. Line it up with the “blob” and stamp. Turned out nicely. The color for the tree trunk is 2013-15 In Color Baked Brown Sugar (pause for sadness to fade again). The tree swing and bicycle is stamped in Early Espresso. The bicycle frame is stamped in Night of Navy.

I decided to use the stamp set’s signature sentiment, “Friendship is a sheltering tree.” I love the sentiment, and really love the font! To keep to the design of the sketch challenge, I masked the sentiment and inked in Baked Brown Sugar the word “friendship.” Although it is hard to see, the word is cut out using the smallest banner die cut, some quick sponging of Baked Brown Sugar around the edges, and affixed to the right side of the card just below the swing. The bow is created with 3 loops using the Crisp Cantaloupe Thick Baker’s Twine. In this picture it hides the “flag” portion of the banner. Reversing the banner so that the flag pointed left instead of right would be a better choice.

To finish the card, I layered on slightly larger Pistachio Pudding card stock, layered again on Whisper White card stock (trimmed with a row of circles from the Painted Petals stamp set — my favorite Stampin’ Up! stamp set), and adhered to a Pistachio Pudding card stock base of 51/2 x 4 1/4.

If you would like specific dimensions and instructions to create your own card, please e-mail me and I will be happy to share them with you. And if you don’t already have a Stampin’ Up! demonstrator, it would be my honor if you selected me to help you in your future creations!

Stamp on!


Sandy
sandee904@yahoo.com

sandee904.stampinup.net  |  sandee904.blogspot.com
Facebook: stampinwithsandee | Pinterest: sandee904

Saturday, April 4, 2015

Saturday Punch Art Projects

Today was a busy day. Lots to do, but still not too busy to squeeze in some stamping and crafting with Andrea and Stephen.  No set plan is the best kind of stamping.  I made a couple of birthday cards.  Andrea has been surfing Pinterest and found a couple of a cards that she wanted to try to replicate.  With great results I might add.

The first card was a little tricky. Quick thinking, Andrea used her own flip flop to create a pattern and then cut the pattern down to size to fit a standard 5 1/2  x 4 1/4 card front. Using some scrap DSP, she cut out two flip flops (one in reverse learned the hard way), laced up some ribbon and set it on a stage of pretend sand. Let’s head to the beach!  (And check out the quality of that photo staging!)

The second card was a real treat! Three circles using the scallop circle punch for the ice cream scoops, a half oval for the dish and a half circle for the bottom of the dish. Looks good enough to eat, right?

Check back soon and I will post pictures for this months’ stamp club. The initial plan is to use the new Sheltering Tree Stamp Set introduced in the Occasions Catalog and a project using the Scallop Tag Topper Punch.

Stamp on!

Sandy

Saturday, February 7, 2015

You Plus Me Stamp Set for Valentine’s Day Reboot 2.0

It’s Saturday morning. So far so good with my second promise to blog more regularly; and my promise last weekend to share a second card for Valentine’s day using Stampin’ Up! You Plus Me stamp set.

This one is really simple to make. (Although last week’s card was simple, it may have been a little more complicated than it looked because the string of teeny tiny hearts can be rascals to glue back to back!) Besides purchasing the You Plus Me stamp set, you will need: Whisper White card stock (CS) base (5 ½ by 8 ½, scored at 4 ¼), Whisper White CS for the sentiment (approx. 2x3 and die cut from Chalk Talk Framelit), Real Red Classic Ink, a 2” strip of the XO paper from the Stacked with Love Designer Series Paper Stack, 5” Real Red ¼” Cotton Ribbon, and Red Glimmer Paper punched using the new Sweetheart Punch.

Quick Tip #1 – It’s all in the details! When cutting the 2” strip of the XO paper, don’t worry about it being exactly 2”, but it must be at least 11 rows of XO or the “white” of this card will take over.  I love my Stampin’ Trimmer because it makes cutting paper precisely so easy. If you don’t have a Stampin’ Trimmer, KNOW your paper cutter. Instead of 11 rows, I wanted the cut to run through the center of the XO row. Just remember whichever way you decide to cut, this strip of paper needs to be at least 2” or else the white on white will take over the card.

Quick Tip #2 – I find it is easier to ink and stamp the You’re Sweet sentiment first and run through the Big Shot second, but if you prefer to line up the sentiment after it is cut that’s okay. The next part is really the trickiest part, cutting the slit on both ends to string the ribbon (ribbon runs behind the sentiment). The sentiment barely fits this shape but this is the shape I wanted, and the look I wanted.  If you want to eliminate the slits from the sentiment layer, I would add Real Red candy dots to both ends of the sentiment, and adhere the sentiment on top of the ribbon with Stampin’ Dimensionals. This will help with the “white” taking over the card.

I hope this inspires you to get out your supplies and start stamping your Valentine a card this weekend!  Remember Valentine’s Day is next weekend!

Stamp on!  Sandy

Find me at:
Stampin' Up! Website:  sandee904.stampinup.net

Email me at:
Email:  sandee904@yahoo.com

Find me at:
Facebook:  StampinWithSandee
Pinterest:  sandee904


Sunday, February 1, 2015

You Plus Me Stamp Set for Valentine’s Day

Here it is the first day of February and this is my first post of 2015. Already second guessing that new year’s resolution to be more committed to keeping everyone updated with my blog! Leave me a comment and let me know your paper crafting interests.

January club was held on Saturday the 17th. It was so good to see everyone and hear about their holidays.  We have a new club member, a recent transplant to the area who found us through Stampin’ Up. She is tried and true Stampin’ Up! She is a great addition to our group.

In addition to birthday cards, our focus was on Valentine’s day cards since February club falls on the Saturday after Valentine’s day. Here’s a picture of one of the two Valentine’s day cards we made.


The card is really simple to make. You will notice that we cut off the right side of the front of the card to showcase the white hearts on black designer paper from Stacked with Love Designer Series Paper Stack. The three (3) hearts strategically aligned along this “shortened” front are created from a truly handmade DSP using the Stripes Mask and punched with the Sweetheart Punch. In creating the DSP, I used the aqua painter and Crisp Cantaloupe Reinker on Whisper White cardstock, carefully turning the Stripes Mask to create the gingham look. (Everyone should write Stampin’ Up! to tell them to never retire the Stripes Mask. I LOVE IT! And you will too.)

The “Be Mine” sentiment is from the You Plus Me Stamp Set, I broke up the sentiment on two hearts punched from the smallest heart die in the Hearts Collection, and the tail of hearts are from the “scraps” of the handmade gingham DSP punched with the small heart in the Itty Bitty Punch Pak linked using Linen Thread, with small pieces of Linen Thread tied in a simple knot between each. I don’t think you can tell from the photo, but the Linen Thread is run between two hearts back-to-back using simply Snail Adhesive (I didn’t want to deal with excess glue on the small hearts).

Just a couple of strips of coordinating Stacked with Love Designer Washi Tape for the finishing touch.

I will share another Valentine’s day card soon so that you have a couple of options.

Stamp on!  Sandy

Find me at:
Stampin' Up! Website:  sandee904.stampinup.net

Email me at:
Email:  sandee904@yahoo.com

Find me at:
Facebook:  StampinWithSandee

Pinterest:  sandee904